Great news, readers: Our library just hit 800 books! That is, we have at least 800 books in our home, catalogued in our Calibre library software. Matt has many more books of his own still stored at his parents' house, but they have not gotten to move here yet, or we'd probably be at 1000!
I am so excited I had to make a short post to share the news. I will try to add updated Book Ruler art to this post if I get the chance, because many of the books that just got added were for my summer classes; therefore, the "Read by Elizabeth" section has increased a lot and I am proud of that. Matt is also hoping to get some reading in and finish some of the books on his list - but work is pretty busy for him and it is harder for him to find time to fit in reading (whereas half of my days are spent getting reading for class done right now).
Anyway, just wanted to share the milestone as we make our way toward our goal of a 1000+ book library someday.
Sunday, June 23, 2013
Monday, June 17, 2013
Project: Growth Chart Ruler
Finally, on to the next project! This one was a team-effort. Matt was away for work for a couple of days and I had to pick him up at the airport on Friday. So, I planned a visit to my friend Melissa on Thursday to work on projects and stay over, saving me from having to get up quite so early on Friday since she lives closer to the airport. We planned ahead and bought and stained the boards for the growth chart rulers we both wanted to make so we could work on the project together. This project can be as cheap or expensive as you make it, basically, and it is really, really easy.
I don't have pictures of my board before I stained it, but Melissa is better at taking pictures of every step of her project process, so whenever she blogs about her side of the project, you can see her board before, I'm guessing. Anyway, I decided to go for a poplar board from Lowe's. I chose this board, and effectively made my project more expensive than it necessarily needed to be, because my experiences with the "cheap" boards (between $5 and $8) seem to always end with slightly (or extremely) warped or beat up boards. Melissa, however, was able to find a really good knotty pine board for about $6 or $7, she said, so I was a little jealous. She must have really taken her time to pick out the least warped one - or maybe Home Depot has a better cheap board selection. However, since the board was the main cost of the project, I didn't feel too bad that my 6' poplar was $16 ... it was still way cheaper than some of these "professionally" made rulers for sale online. But I probably could have found a decent one for less if I really wanted. I also bought red oak stain in a little pint tin for about $5. So, my project came to about $20.
First, sand and stain the ruler. I am a lazy sander so I just did a slight sanding, and my board is still a little rough to touch, but I don't plan on anyone rubbing their hands over it much, so I'm not too worried. I will say that Melissa's board was amazingly smooth, thanks to her husband. I think if Matt had been around he would have done the perfectionist thing and sanded my board nice for me, too. I stained one coat on each side and then did one thin coat of polyurethane on each side. I was not sure if I really needed that, but wanted to give it a little extra protection. I did this a few days before, of course. After it was all dry, I took the board to my co-crafter's house and we got to work.
First, sand and stain the ruler. I am a lazy sander so I just did a slight sanding, and my board is still a little rough to touch, but I don't plan on anyone rubbing their hands over it much, so I'm not too worried. I will say that Melissa's board was amazingly smooth, thanks to her husband. I think if Matt had been around he would have done the perfectionist thing and sanded my board nice for me, too. I stained one coat on each side and then did one thin coat of polyurethane on each side. I was not sure if I really needed that, but wanted to give it a little extra protection. I did this a few days before, of course. After it was all dry, I took the board to my co-crafter's house and we got to work.


You can use a tape measure to mark each inch. I made a slightly longer mark at each foot mark. What I suggest doing for the growth chart is to start the board at 6 inches. This way, you can hang the board up and it will give you a little room over 6' with just a 6' board. You could also buy a longer board and let it just sit on the floor, but for Matt and I, 6' 6" is more than we should need for our kids and I wanted to hang the ruler. This means the first foot mark will only be six inches up from the bottom of the board, and you'll want to make sure to hang it six inches from the floor.

I used a Sharpie to mark and color my lines and I think it worked fine. Melissa used a paintbrush, which was a little more tedious to control but also looked good. The picture above is just an example of my first marks. I then went back to thicken and lengthen the lines.

Break for a delicious dinner of grilled chicken and zuccinni and chips. Thanks guys!
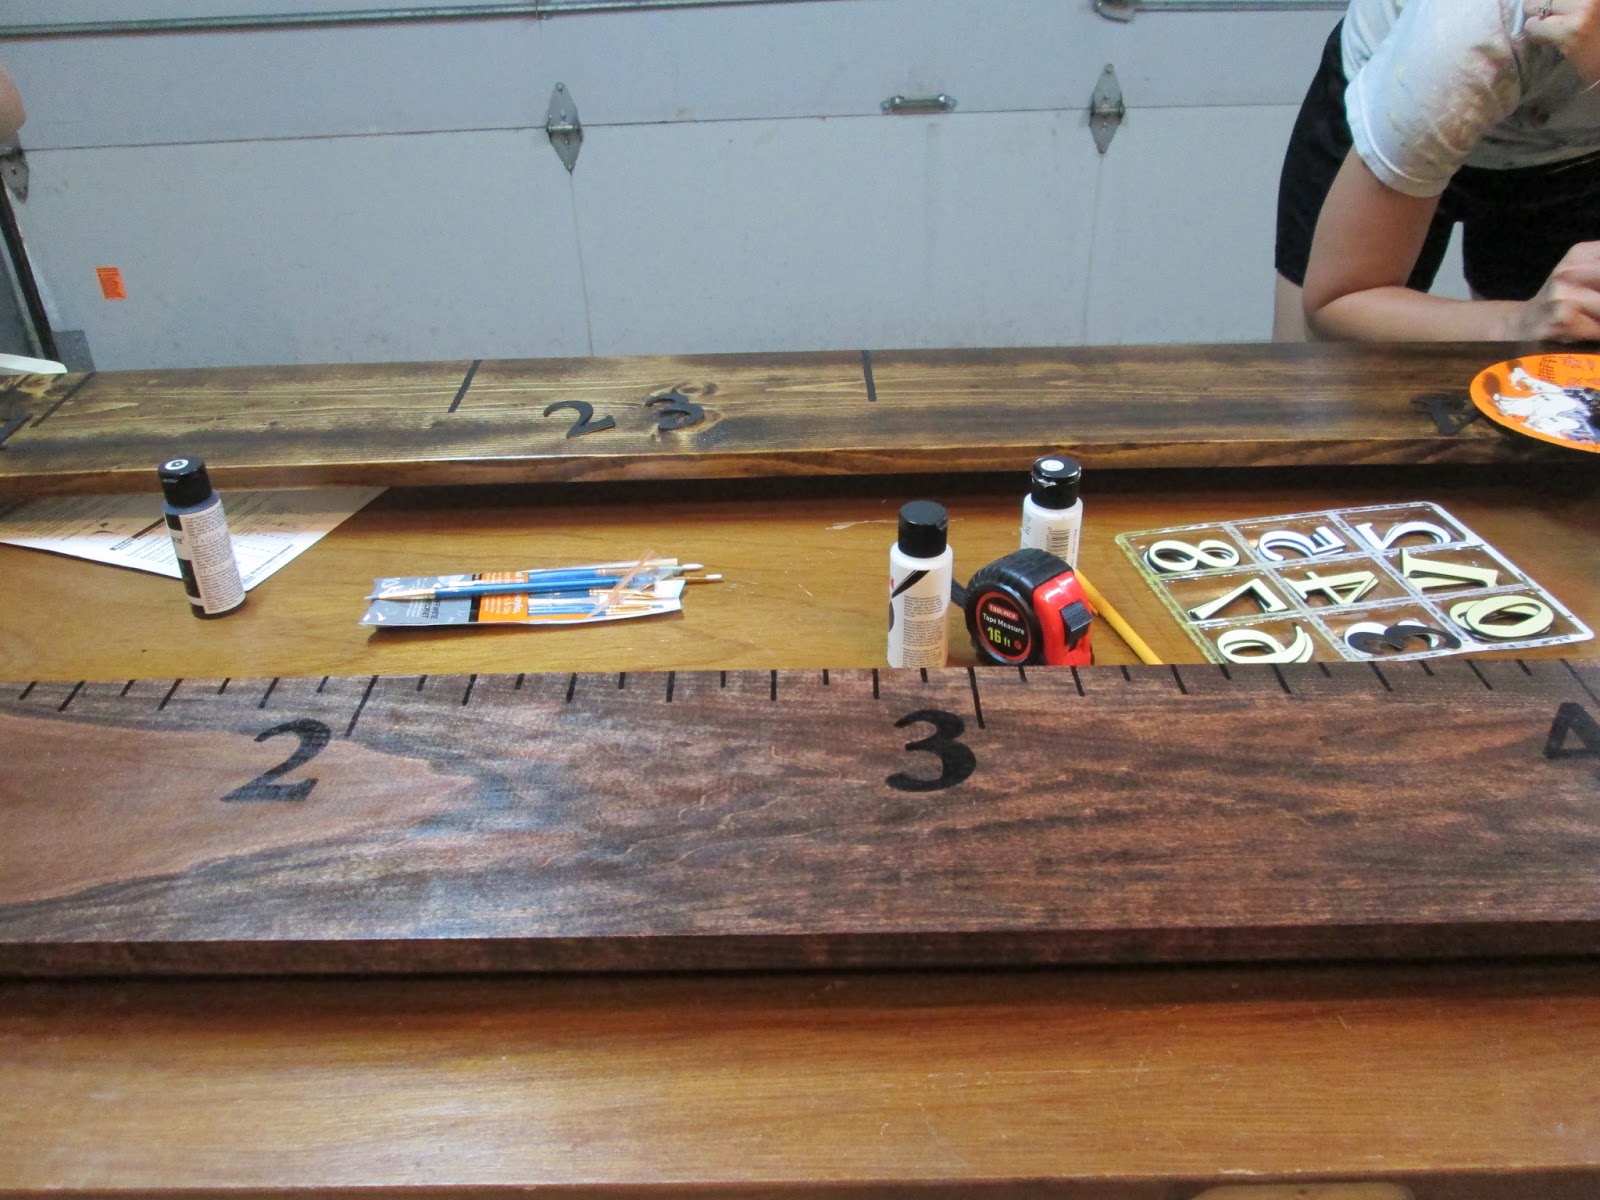
Back to work. You can see I've now got all the lines marked and drawn to the lengths I wanted. I borrowed Melissa's stick-on numbers and traced them then colored with Sharpie. There's Melissa, working away.

And finally, the two finished products. A really easy DIY project. Now all I need to do is attach something to the back to hang it. I am planning to nail in one of those self-leveling hangers with the little teeth at exactly 5' 6" on the back of the board (which will not align with the mark for 5' 6" on the front of the board, but would align with 6'). This way when I hang it, I can measure to an even 6' off the floor and the board should then hang so that the numbers are correct. I plan to measure Matt and I on the board since we are now at the tallest we'll ever be (no, Wyatt, I'm not going to mark if we shrink, but I'll be able to look back at least and say, "Well, I was once over 5'...") and then someday we'll measure our children's heights each year. I'm excited to get another project down in the midst of school! As Melissa said, I'll have to focus on the quick and simple ones for a little while.
Some Recent Adventures: June 2013
Here is a quick run-down of some exciting adventures we've been having this summer, in case you were interested:
Right before we headed out, I interviewed at a high school where I've wanted to work eventually, and they offered me the job! Although I'll miss being a GA in the fall, I'm very excited to have a full-time job a year earlier than I planned, in just the place I wanted to work. I'll still be taking one graduate course per semester, so it will be a busy year, but there will be lots of new experiences I am excited about.
 |
| This summer has been the summer of instruments. At a couple different auctions and a "garage" sale, we've bought: a violin, an oboe, a saxophone (which we later sold to another auction-goer who said he was really interested in it), and this GORGEOUS organ. The organ is probably the "best buy" considering its size, the shape it is in (it works - only one pedal strap is broken we think, so we're hoping to get that checked out, and a couple stops don't work, but it is playable), and the price, $80. Matt is loving it and is learning to play tons of video game music on it. |
 |
| The garage and driveway were repoured. I didn't think to take before picture of the garage, which was the worst part. It had a split down the middle that left one side about an inch higher than the other, and both sides slanted downward. The driveway was also bad near the road and several days a week my car would bottom-out on it. |
 |
| It is SO beautiful now. |
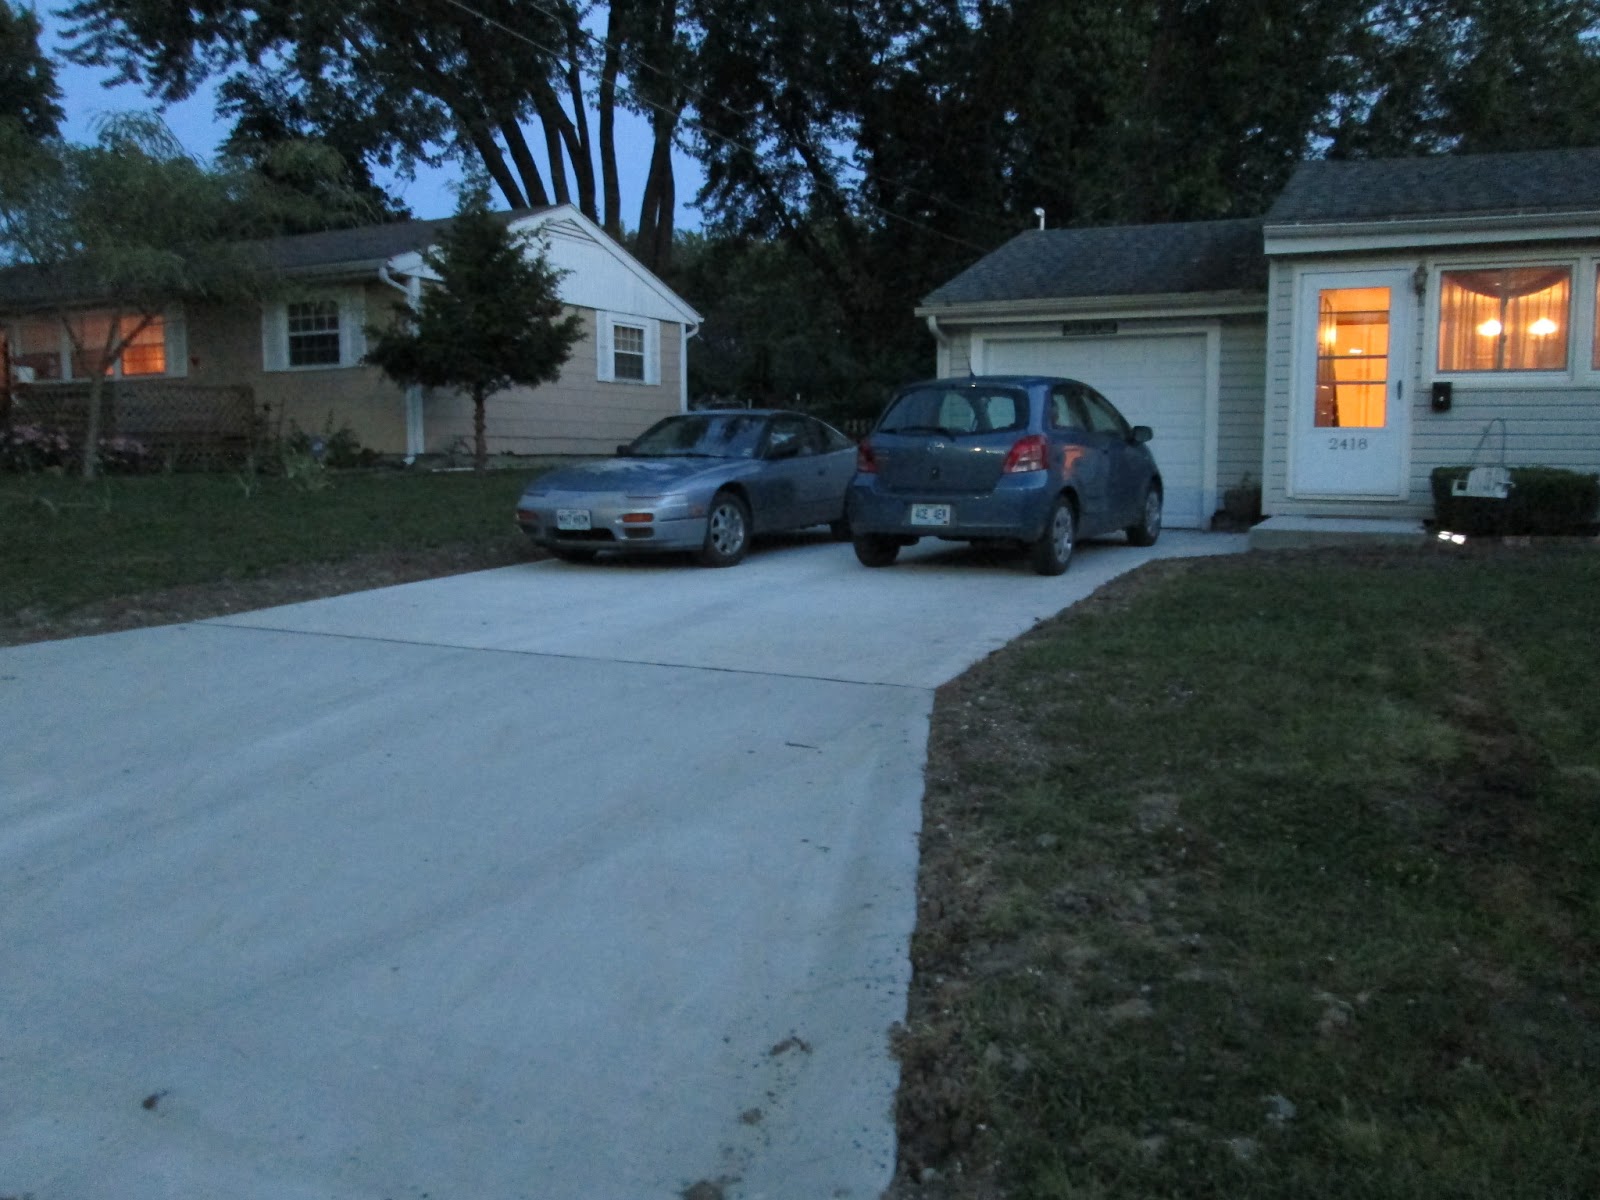 |
| I probably have an old picture of the front of the house showing the driveway before but am too lazy to look it up right now. Trust me, it is much better. They even made the driveway smooth out to the street rather than have a dip. I sometimes forget and slow my car down, then when I roll out to the street it is heavenly. |
 |
| We bought and planted this delphinium, which entranced Matt with its blue-purple flowers... |
 |
| ... and this clematis, some balloon flowers, and dusty miller. |
 |
| Tired of the dishwasher not fully cleaning the dishes, I stupidly added just a little bit of dish soap (for handwashing) as "prewash." Bad idea. Llyr was meowing like crazy and I thought he wanted to go out, but after walking into the kitchen to find this, I think he was alerting me that a white, fluffy monster was creeping out of the dishwasher and scaring him. |
 |
| Luckily it cleaned up pretty easy with a towel. It was mostly suds. |
 |
| After my craft-visit with Melissa, I picked up Matt and we headed to Arrow Rock for a short vacation to see The Wizard of Oz at the Lyceum Theatre. We stayed at Borgman's Bed and Breakfast, which was really homey and relaxing. I would definitely recommend it. |
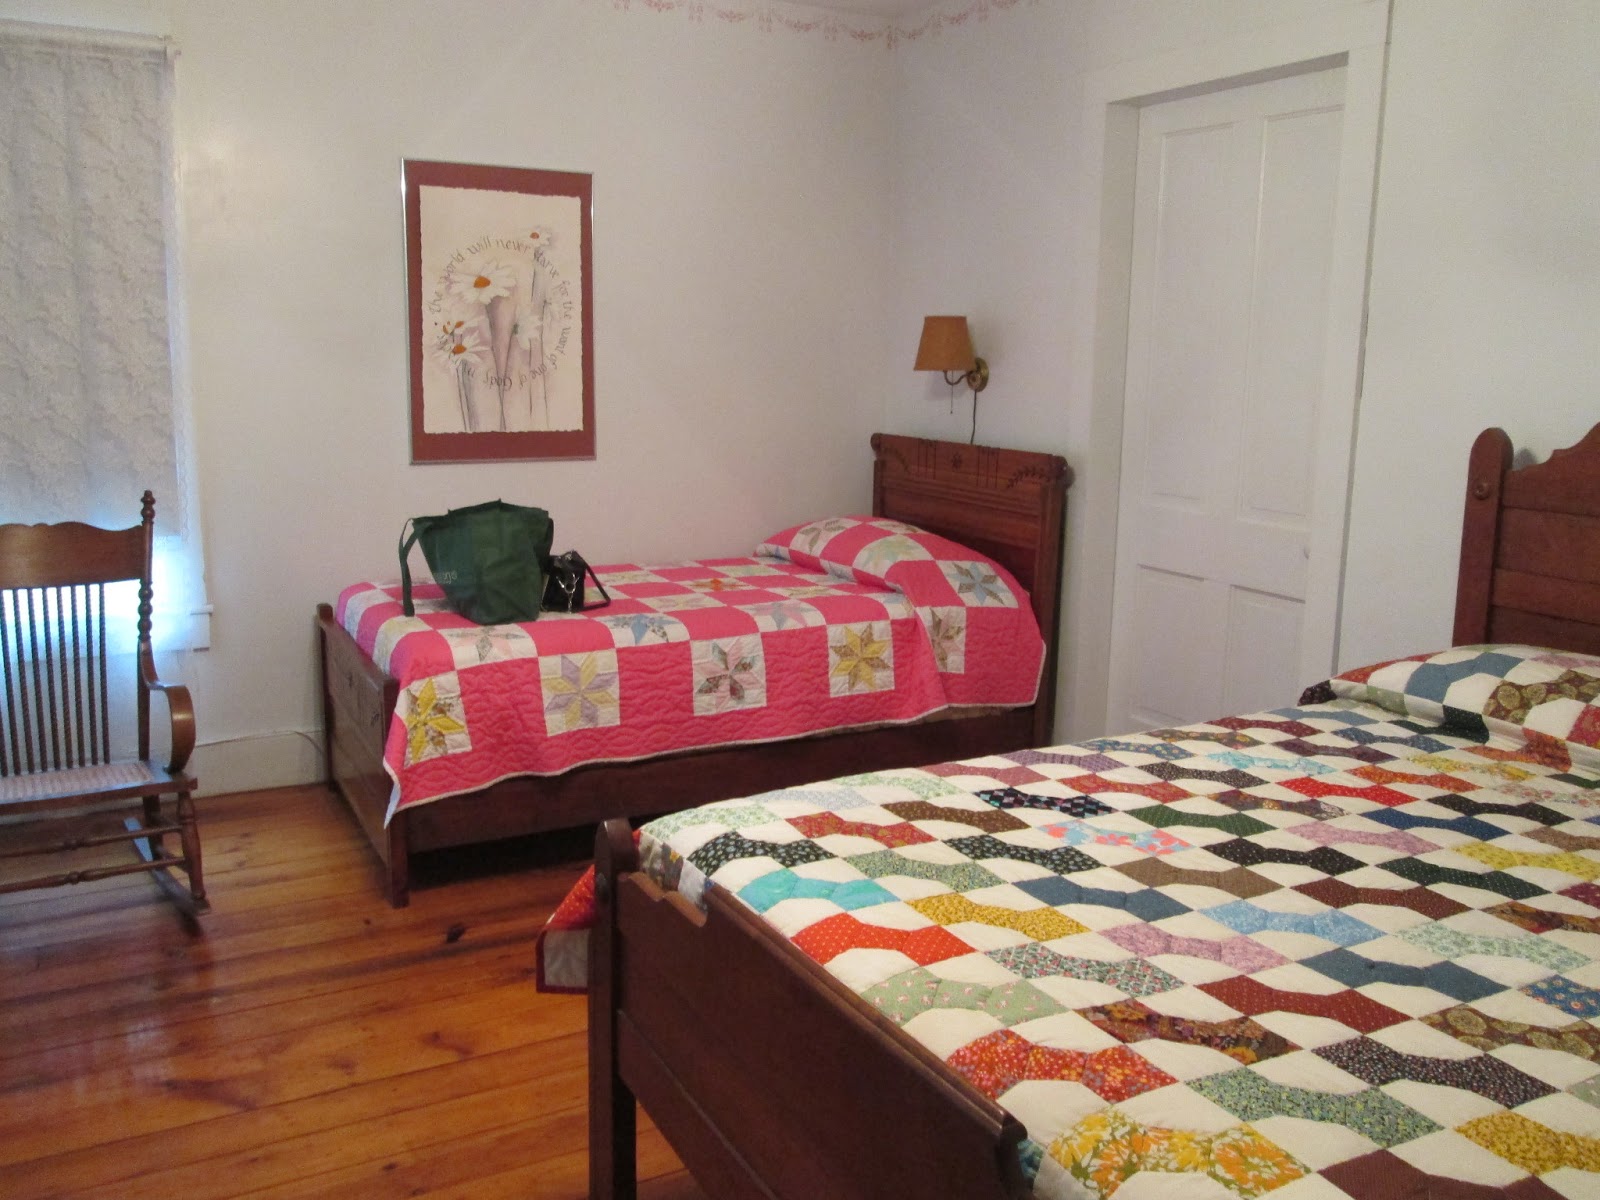 |
| Sweet old-time quilts and decor in the upper rooms of the house. We also were treated to a delicious breakfast and got to chat with the owner and two other guests the next morning. |
 |
| We met Mr. Fancy Pants, who made us miss Llyr a little less, since he was practically exactly like him, but with a LOT longer, fluffier hair. He acted a lot like Llyr, too, in all the nice ways. He lives at the B&B. |
Right before we headed out, I interviewed at a high school where I've wanted to work eventually, and they offered me the job! Although I'll miss being a GA in the fall, I'm very excited to have a full-time job a year earlier than I planned, in just the place I wanted to work. I'll still be taking one graduate course per semester, so it will be a busy year, but there will be lots of new experiences I am excited about.
 |
| We ate at the J. Huston Tavern. They only have one meal option, but it is basically all you can eat. There was fried chicken, roast beef, roasted corn, green beans, mashed potatoes, biscuits with apple butter, fruit, and it was all DELICIOUS. SO FULL AFTERWARDS! |
 |
| We got hot, amazing cherry cobbler in this adorable little cup for dessert. Very nice celebratory dinner! We'd originally planned this trip as sort of extra-anniversary celebration since we didn't have a lot of time in April to celebrate and we wanted to see the play, but it turned out to be great timing since I got the job that day, too. We didn't plan anything for this night, but just spent time sitting (and reading for me ... still had to do some schoolwork) on the porch swing, and heading to bed early. It was a calm, beautiful day. The next day we ate at the Iron Horse in Blackwater (also delicious) and saw the play with my family. The Wizard of Oz was AMAZING. One of the best plays I've been to, and I love the movie, so there's always that worry that it won't live up to it (being slightly different is fine, but sometimes plays just doesn't seem to do justice to the movies we remember from childhood). I need not have worried - it was spectacular. They even had Ms. Gulch "fly" across stage on her bike, and the lion sounded just like the guy from the movie. Very fun weekend all in all. |
Monday, June 10, 2013
Project: Hammock
Finally, the hammock project is finished! I saw this project idea in the May 2013 Martha Stewart Living which had a section about crafts to make with canvas drop cloth. I decided to try the hammock since Matt and I have wanted one for a while. Unfortunately, I think we probably could have bought a cheap-to-decent hammock for as much or possibly less than what I spent making this one. So that's a bit of a bummer, and maybe my suggestion to you should be to just buy a hammock, since it might be cheaper and would certainly be sturdier. However, I am proud of the hammock I made, and as long as it continues to hold up, I think it might have been almost worth it. I also like several of the other drop-cloth crafts and they all look a little simpler and more workable than this one.
I followed the instructions in the MS Magazine . . . but I either didn't follow them in exactly the right way or Martha was being really optimistic with how this would work. I had several snags. I see now looking at the instructions on the webpage that someone else had the same trouble with grommets . . . and I must admit that I'm not sure if anyone much bigger than me (at around 100 pounds) could hold up really well in the hammock I made. Perhaps if I tried to sturdy it in other ways to make it hold better. Well, anyway, after all the work I spent on it I'm still going to tell you about this project, even though it was not an all-around success.
First of all, I had to buy a canvas bigger than I wanted, so that cost more. Martha suggested 6x9 and I went to Westlakes, where they only had 4xsomething and 12x9. That was my own fault - I should have checked Lowe's, too. I ended up spending $22 on the canvas instead of Martha's example of $11.50. I have canvas leftovers, of course, but wish I didn't have to spend the extra. Plus, that meant extra cutting and sewing an edge. Not too big of a deal though.
The first step after this is to fold over the end edges and sew a hem for "reinforcing." I'm guessing Martha (I say Martha, but I realize Martha doesn't actually write hardly any of the articles, and may not even try out all the crafts) meant to help the grommets that come in later keep from ripping out of the canvas. You will see later that this did not work well for me. I should have seen this coming since every time I've used grommets in costumes they've been notorious for ripping out, even when they DON'T have to hold any weight. But I followed the step. The next picture is of the folded over hem and placed grommets.
So, the grommets and grommet setter are another cost. Martha says to evenly space 18 grommets on each end. The grommet setting kit was $11.50 and extra grommets were basically $5. I could not get the grommet puncher to punch through two layers of the canvas, so instead I snipped a very small x where the grommet would be placed. This allowed me to push one grommet half through the x to be punched. This may have been a mistake that led to ripping, since instead of a round hole in the fabric there were snips that could possibly more easily rip . . . but I really think the fabric would have ripped anyway when I laid on it the first time. If you try it and find out otherwise, let me know.

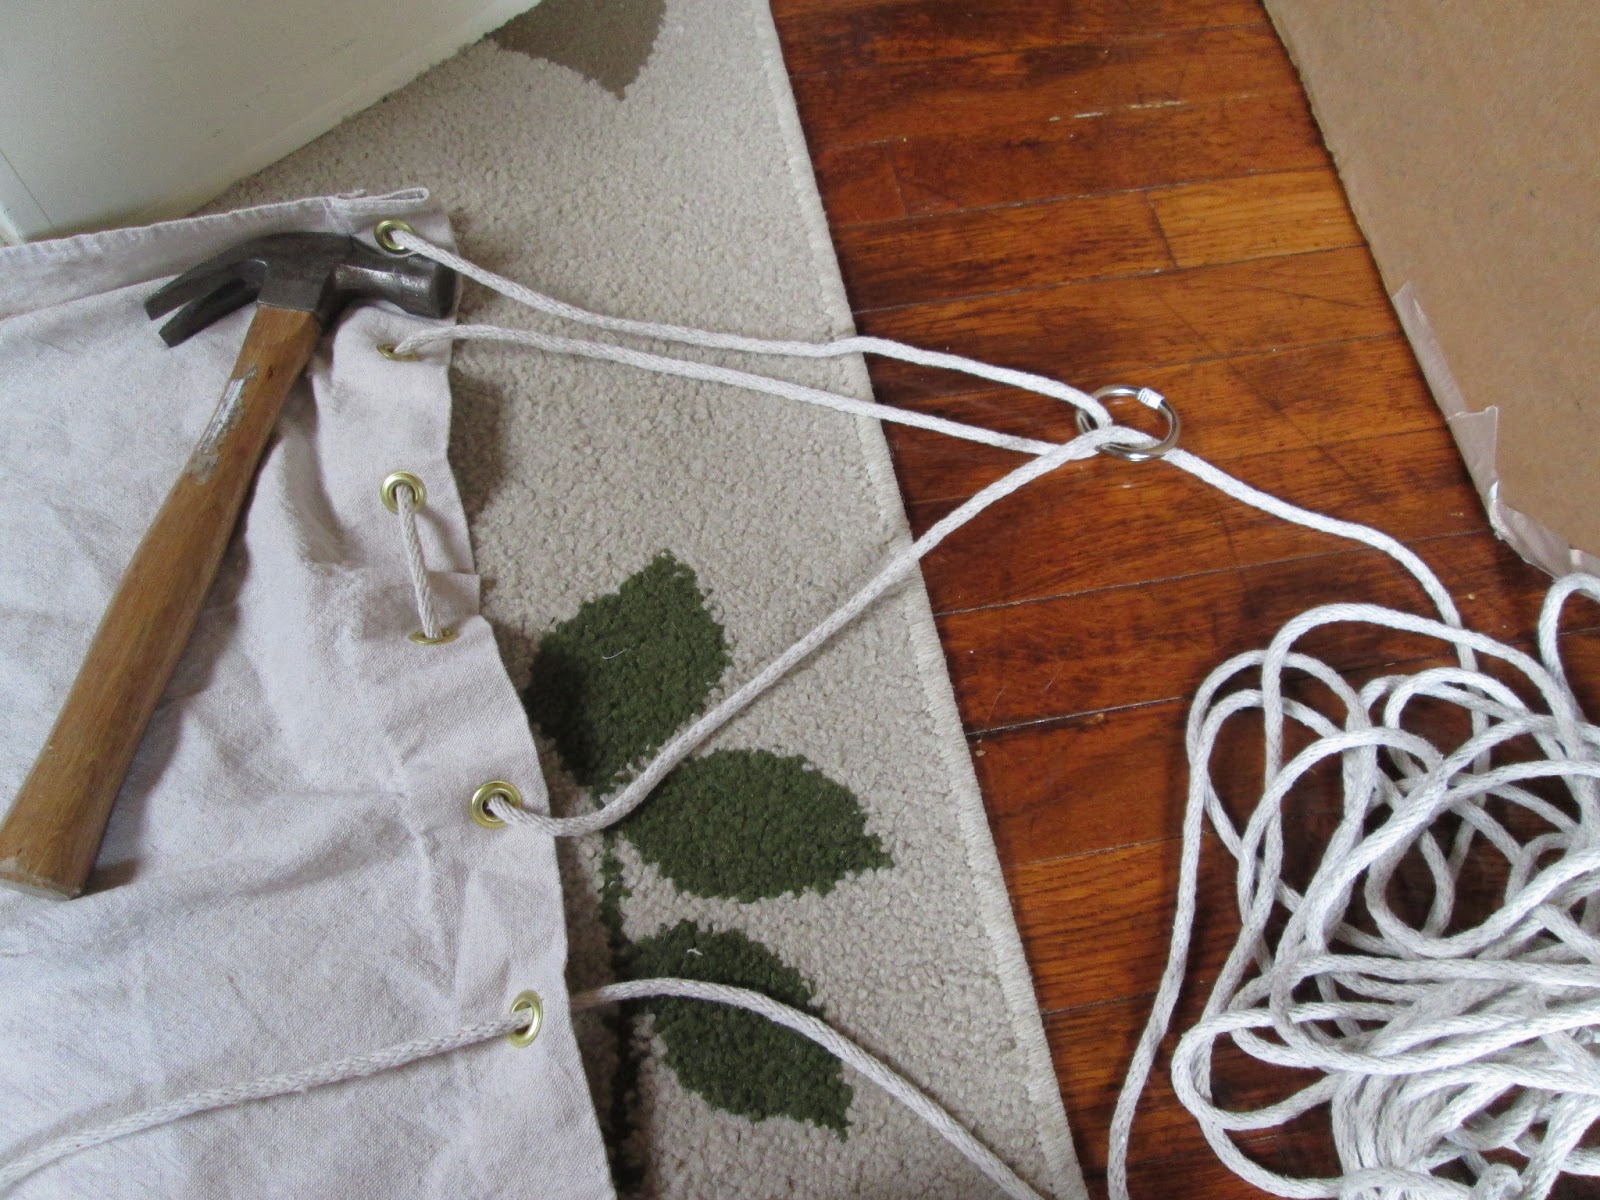
After all the grommets are set, you can attach the cotton rope. Martha used a really funky pattern to get the rope through the grommets: through the back of the first grommet, through the o-ring, through the front of the second grommet, through the back of the third grommet, through the front of the fourth grommet and through the o-ring again. I followed the directions the first time. I realized later that this hammock would NOT lay anywhere near flat. It wanted to lay halved in the air even after I adjusted the rope - however, maybe this pattern and that type of hammock (the u-shaped rather than flat type) are sturdier? Or maybe just easier to make.

Kitty helping me do a preliminary adjustment of rope inside. Look at that craft mess.

We don't have two trees in our backyard. Well, we do . . . one is giant and old and drops branches all the time and the other, a teeny little willow tree, is on the opposite side of the yard. I used the clothesline pole and a post on the back fence to test it out and adjust some more.


At this point I decided that maybe using a wooden bar would make the hammock more like I wanted it, and maybe would alleviate some of the pressure on the grommets by dispersing it a little. So, I used two boards I already had to create bars. I had to unstring the rope (took forever!) and lay the grommets over the wood bar to mark exactly where holes needed to be drilled in the bar. I drilled the holes, and restrung the rope, this time through the grommets and wood bar and o-ring. This time, I strung the rope through the o-ring after every hole instead of following Martha's pattern, thinking this would be better in this case. And I took some twine and fixed/reinforced the grommets. Not all of them, mostly the middle ones. So far it seems to have worked. It at least seems to be able to hold my weight without ripping them more.

Above is Llyr helping me decorate the hammock after it was put together. I used a Winnie the Pooh quote: "What I like doing best is Nothing." "How do you do Nothing?" asked Pooh after he had wondered for a long time. "Well, it's when people call out at you just as you're going off to do it, 'What are you going to do, Christopher Robin?' and you say, 'Oh, Nothing,' and then you go and do it. It means just going along, listening to all the things you can't hear, and not bothering." "Oh!" said Pooh.”
That quote does not describe me at all, by the way. I always have to be doing something. But I couldn't find any other quotes that had a hammock-y theme . . . and maybe I can enjoy just reading, and not bothering about anything else, in my hammock.

To hang the hammock, I also had to buy a post and cement it in the ground. I guess there might have been other solutions, but I'm hoping this will work. The 4x4 6-foot post was about $8 and the sandcrete was really cheap. I'm planting some flowers around the post.

Tried the hammock out today and I think if it will continue to hold up, it will be a success, albeit more expensive than I'd wished for a project. The eye hook I used on the post slipped a little when I laid in the hammock, but I twisted it in tighter and I think it may work. The hammock also sags a LOT when I am in it - so if you try this one out, be prepared for that - or maybe you could really "reinforce" and steady this by using other material that is not as stretchy.

Me and kitty in the hammock. Overall, probably not the very best choice of project, since, as I said, I probably could have bought a nice hammock for around the same price (when I factor in the canvas, ropes, o-rings, grommet kit, etc, it was $70+) that would still be enjoyable, even if not handmade. Maybe more enjoyable because I wouldn't have to worry about it falling down to stretching. But, I'm happy enough with this one for now and I will keep trying to find ways to sturdy or improve it if need be.


I followed the instructions in the MS Magazine . . . but I either didn't follow them in exactly the right way or Martha was being really optimistic with how this would work. I had several snags. I see now looking at the instructions on the webpage that someone else had the same trouble with grommets . . . and I must admit that I'm not sure if anyone much bigger than me (at around 100 pounds) could hold up really well in the hammock I made. Perhaps if I tried to sturdy it in other ways to make it hold better. Well, anyway, after all the work I spent on it I'm still going to tell you about this project, even though it was not an all-around success.
First of all, I had to buy a canvas bigger than I wanted, so that cost more. Martha suggested 6x9 and I went to Westlakes, where they only had 4xsomething and 12x9. That was my own fault - I should have checked Lowe's, too. I ended up spending $22 on the canvas instead of Martha's example of $11.50. I have canvas leftovers, of course, but wish I didn't have to spend the extra. Plus, that meant extra cutting and sewing an edge. Not too big of a deal though.
The first step after this is to fold over the end edges and sew a hem for "reinforcing." I'm guessing Martha (I say Martha, but I realize Martha doesn't actually write hardly any of the articles, and may not even try out all the crafts) meant to help the grommets that come in later keep from ripping out of the canvas. You will see later that this did not work well for me. I should have seen this coming since every time I've used grommets in costumes they've been notorious for ripping out, even when they DON'T have to hold any weight. But I followed the step. The next picture is of the folded over hem and placed grommets.
So, the grommets and grommet setter are another cost. Martha says to evenly space 18 grommets on each end. The grommet setting kit was $11.50 and extra grommets were basically $5. I could not get the grommet puncher to punch through two layers of the canvas, so instead I snipped a very small x where the grommet would be placed. This allowed me to push one grommet half through the x to be punched. This may have been a mistake that led to ripping, since instead of a round hole in the fabric there were snips that could possibly more easily rip . . . but I really think the fabric would have ripped anyway when I laid on it the first time. If you try it and find out otherwise, let me know.

After all the grommets are set, you can attach the cotton rope. Martha used a really funky pattern to get the rope through the grommets: through the back of the first grommet, through the o-ring, through the front of the second grommet, through the back of the third grommet, through the front of the fourth grommet and through the o-ring again. I followed the directions the first time. I realized later that this hammock would NOT lay anywhere near flat. It wanted to lay halved in the air even after I adjusted the rope - however, maybe this pattern and that type of hammock (the u-shaped rather than flat type) are sturdier? Or maybe just easier to make.
Kitty helping me do a preliminary adjustment of rope inside. Look at that craft mess.

We don't have two trees in our backyard. Well, we do . . . one is giant and old and drops branches all the time and the other, a teeny little willow tree, is on the opposite side of the yard. I used the clothesline pole and a post on the back fence to test it out and adjust some more.

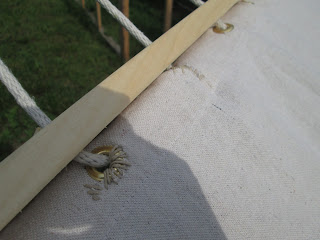
As soon as I laid in the hammock, which was kind of tricky as it wanted to swing sideways, I heard some ripping. Below is what happened when I put weight on the middle grommets.


At this point I decided that maybe using a wooden bar would make the hammock more like I wanted it, and maybe would alleviate some of the pressure on the grommets by dispersing it a little. So, I used two boards I already had to create bars. I had to unstring the rope (took forever!) and lay the grommets over the wood bar to mark exactly where holes needed to be drilled in the bar. I drilled the holes, and restrung the rope, this time through the grommets and wood bar and o-ring. This time, I strung the rope through the o-ring after every hole instead of following Martha's pattern, thinking this would be better in this case. And I took some twine and fixed/reinforced the grommets. Not all of them, mostly the middle ones. So far it seems to have worked. It at least seems to be able to hold my weight without ripping them more.


Above is Llyr helping me decorate the hammock after it was put together. I used a Winnie the Pooh quote: "What I like doing best is Nothing." "How do you do Nothing?" asked Pooh after he had wondered for a long time. "Well, it's when people call out at you just as you're going off to do it, 'What are you going to do, Christopher Robin?' and you say, 'Oh, Nothing,' and then you go and do it. It means just going along, listening to all the things you can't hear, and not bothering." "Oh!" said Pooh.”
That quote does not describe me at all, by the way. I always have to be doing something. But I couldn't find any other quotes that had a hammock-y theme . . . and maybe I can enjoy just reading, and not bothering about anything else, in my hammock.

To hang the hammock, I also had to buy a post and cement it in the ground. I guess there might have been other solutions, but I'm hoping this will work. The 4x4 6-foot post was about $8 and the sandcrete was really cheap. I'm planting some flowers around the post.

Tried the hammock out today and I think if it will continue to hold up, it will be a success, albeit more expensive than I'd wished for a project. The eye hook I used on the post slipped a little when I laid in the hammock, but I twisted it in tighter and I think it may work. The hammock also sags a LOT when I am in it - so if you try this one out, be prepared for that - or maybe you could really "reinforce" and steady this by using other material that is not as stretchy.

Me and kitty in the hammock. Overall, probably not the very best choice of project, since, as I said, I probably could have bought a nice hammock for around the same price (when I factor in the canvas, ropes, o-rings, grommet kit, etc, it was $70+) that would still be enjoyable, even if not handmade. Maybe more enjoyable because I wouldn't have to worry about it falling down to stretching. But, I'm happy enough with this one for now and I will keep trying to find ways to sturdy or improve it if need be.


Subscribe to:
Posts (Atom)