Wednesday, June 10, 2015

Summer Project: Holo the Wisewolf Pink Blouse

Part 2 of my Holo costume is complete: the pink blouse, as seen here:

https://theproductofprimes.files.wordpress.com/2012/05/holo-1.jpg

I used this pattern, which I got for ONE DOLLAR at that Jo-Ann's sale I mentioned


https://s-media-cache-ak0.pinimg.com/236x/0f/0b/28/0f0b2859c73e351ed9c0904f75283208.jpg

I picked this because although I found a cosplay site online with basic pattern sketches, I work better off of actual patterns most of the time. I saw that this "easy-to-sew" pattern had a 3/4 sleeve version that would be close to the style of Holo's shirt. Holo's shirt technically just has one front piece instead of the several pieces sewn together that this pattern has, but since I made them all the same pink, I think they don't stick out too much.

The only thing I don't like about these "simple" patterns is that sometimes they don't include directions for lining and they leave some inside seams raw. I don't like that because they can fray, but for now I just followed the directions. Maybe I'll get some iron-on tape or something and cover them later. A serger would probably also be helpful to fix those.

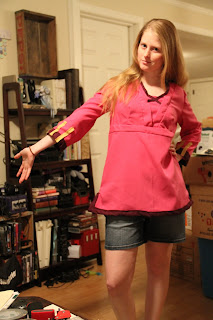
Here is the finished shirt:


The neck part is not exactly like the real shirt, but I think the rest is pretty darn close!


 Materials Used:

Wuji Very Berry Amaretto fabric. I bought 3 yards on sale at $5.99 a yard, but I probably only used about 1.5 yards. I wasn't sure when I bought it how much it would really take. So, I probably spent about $8 conservatively on the pink fabric that I actually used for the shirt.

I used a little of the Wood Potent Purple Solid fabric which I mentioned in the previous post about the cloak. I bought 2 yards and have probably used 1 or less so far in trimming. It was also on sale at $5.99 a yard, so we'll say I have spent about $6 so far using that between the cloak and shirt.

I already had the golden ribbon for the sleeve detail.

Total: about $15 or less for the shirt

Now I just have to make pants, the pouch, the belt, a tail, and ears, and the costume will be done. I will get back to you when I'm done with the next step!

The Cat Who Came Back

Once upon a time, there was a small family who lived on a street in town. There was a woman, a man, and a cat named Llyr who lived with them. The couple really loved cats, but their house was very small, so they couldn't get another inside cat to be friends with Llyr.

One day, a few friendly neighborhood cats started showing up on the couple's porch. There were only a few at first. The couple really loved cats, and the cats looked very hungry, so they gave the cats some food on the back porch to encourage them to stay in the backyard, away from the dangerous road where cars drove too fast and away from other neighbors who did not like cats so much.

Eventually, five cats were eating in the couple's backyard! There were the girl kitties -- Snubs, Gray Calico, Chinstrap, and Littles -- and one boy kitty -- Dan. Snubs and Dan were very, very friendly and wanted to move inside with the couple, but there was not enough room, so they had to live outside. However, they came up to get pets every morning when the couple put out food for them. The other girl kitties were shy. They ate a little food, but didn't like to be pet as much. Llyr was happy because he could watch his friends play outside and, sometimes, he could go out and sniff them before playing in the grass. Snubs and Dan always rubbed up against Llyr to show that they liked him, too.

One day, the couple noticed that the girl kitties looked like they were going to have kitties of their own! The couple was worried about how many kitties there would be on the street. So, they took Dan to the clinic to have an operation so that there would be fewer kitties in the future. The couple decided they'd take some of the other cats after their kitties were born and old enough to take care of themselves. When Dan went to the clinic, the vet said that Dan had a slight problem with his heartbeat, and it could cause problems during his operation. The couple was really scared for Dan, but they told the vet to go ahead.

Dan made it through the operation perfectly fine! The couple was so happy because Dan was such a nice, loving outdoor cat and now he could protect his cat family without making a lot more kitties. Dan was really brave and nice throughout the whole process. He was a trooper.

Over the next month, kitties started to be born! Snubs had two gray kitties that she eventually brought out on the back porch. Some of the other cats had kitties, too, but they were born in other places, so the couple did not see them for a while. There were getting to be too many cats on the back porch. Then, the couple found a new home in the country! They planned to move to their new home in a month and they were very happy because they knew Llyr would love the new home, and now all the outside kitties could come live in their barn and be safe from the road and not bother anyone.

Then, one night a few weeks before the couple was going to move, three new kittens appeared on their back porch! They were Chinstrap's calico and orange kittens. The couple said hello to them and put out some food for their mama, then went to bed. There were now 10 cats outside! That was a lot of cats ... but the couple was sure they could move them all to their new barn, where they'd be happy and safe and they could hunt for mice.

The next morning, Dan and Gray Calico were nowhere to be found. They didn't come for breakfast and did not show up all day. The couple was really worried about them. They called the shelter and talked to some neighbors, but no one had seen them. The couple was so sad. They were afraid the cats might have been hurt or taken away just before they got to move them to a new, safe home.

The next day, there was a different big male cat that scared the mama cats on the back porch. Snubs hissed and hissed to keep it away from her babies. The couple shooed it away, but they were extra sad that Dan had disappeared and now his kitty family had no one to protect them.

Then, the next day, Snubs disappeared, too. Three big kitties were gone suddenly and the couple didn't know why. Luckily, Chinstrap took care of not only her three kitties, but also Snubs's two bigger kittens as well.  Now there were 5 kittens and only two mama cats: Chinstrap and Littles (who did not have kittens yet).

The couple became more and more sad. Their kittens and mamas were safe, but they were sad about the three big kitties that had disappeared, especially Snubs, who was a mama, and Dan, who was so, so friendly.

Then, one morning, a few days after the cats had first disappeared, the woman went out to feed the remaining cats. After Chinstrap and Littles and some of the bigger kittens started to eat, another cat jumped over the fence and ran up alongside them.

It was Dan!

The woman was so happy, she ran in to get her husband and show him that their beloved Dan was back. Dan seemed healthy and fine, and he started to eat like he'd never left. The couple was overjoyed and showered Dan with love. Now the big daddy cat of the cat family was back to protect his kitties! The couple still did not know what had happened, but they were so happy that Dan had found his way back. They still missed Snubs and Gray Cali, but they hoped that maybe they'd return, too.

The couple was so excited that one of their missing cats had come back.

Tuesday, June 2, 2015

Summer Project: Holo the Wisewolf Cloak

Matt and I started watching "Spice and Wolf" earlier this year and we are hooked. We've now watched all the episodes of the anime and I've read up to book 8 of the light novels. They are so great! For Halloween this year, I think we are going to try to dress up as Holo and Lawrence, which calls for some costume making this summer!

I will be making Holo's "pink blouse and brown cloak" outfit:


So far, I have made the cloak:


Here is the pattern I followed, with some adjustments to the hood to make it look like Holo's which is connected in the front to form a sort of cowl. This is a really, really easy and fast pattern for a cloak, especially if you get a material that does not need a lining and won't unravel at the edges. My cloak could probably have a lining, but since the front edges happened to end on the selvage edge, I think it will be ok for a while without anything else, just one layer.

 
My attempted cowl was make by using the hood pattern piece but cutting it out with an extra piece toward the front to sew together and form a connected hood. It does not exactly stand up like Holo's cowl does, and also, it just BARELY fits over my head since it cannot dis-attach and open up like a normal cloak. I may have to do some cutting and adjusting in the future. But, a benefit of this is that there is no need for a clasp or tie. Slip it on and it just stays!

 
I trimmed the cloak with some maroon material, but the rest of the cloak is made from a heather brown "suiting" material, so it's fairly thin and light.


Materials Used:

Wuji Brown Heather Solid, 4 yards at $4.19 a yard: $16.76 plus a little extra for the hood. They only had 4 yards whole, and I was worried this would not cover it since the cloak technically calls for about 6 ... but I'm small and it turned out ok. I bought some "end of bolt" pieces, one of which I used for the hood, just in case. They were very cheap.

I also used a teeny bit of Wood Potent Purple Solid. I bought 2 yards at $5.99 a yard, but it was basically negligible for this project, and I'll use the rest for other parts of the costume and add it in there.

Total Cost: about $18

Fabric prices are high, especially suiting, to which I have recently been drawn. But luckily, during my stop at JoAnn's on the way to State Track to watch a friend run, they were having a Memorial Day 40% off sale! I saved over $10 on the brown suiting. It was going to be a fairly expensive cloak anyway unless I got really cheap fabric, since it calls for so much, but I felt like I was able to get a fabric that I liked and though it was definitely a splurge day buying fabric (I spent $75), I felt a little justified since I have this great costume in store and I also did save a lot ($99 overall!!). They were having a sale on patterns, too: up to 5 for $1 each. SERIOUSLY! I bought three. That's where I saved the most money, and was able to finally get the awesome Elizabethan dress costume I've wanted but refrained from buying since it is normally $17 just for the pattern (yipes).

Anyway, got off on a tangent there, but I will keep you updated on how the rest of the costume turns out for anyone who might be interested! 

Kitties at our House

I just want to share some lovely kitty pictures for your enjoyment. As well as our lovely Llyr, some other cats have been hanging around our house this summer.

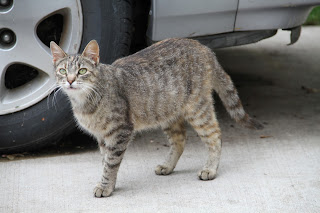
This is Dan. He is the main guy who hangs out - mostly in this flower pot or crying at the back door for attention. Really, he is a sweetie. He lays down and actually likes it when I pet his belly, which he shows off by curling around my hand and forcefully pushing his head against my hand for more pets. We had him fixed a month or so ago even though he is an outside cat to try to prevent too many more kittens from appearing, and man, he was a trooper during the whole thing.


 This is Littles. She is pretty skittish, but so pretty! I finally got to pet her a little recently.

This is Snubs (because of her squinty-eyed look that makes her nose look snubby) and her little kittens! They are adorable. The mostly hiss at me when I try to touch them, but if I pet them, they don't protest too much more than that. Snubs is so sweet and little. 


Dan and Littles thought this mat I set out while cleaning the garage was for them to nap on.


"Upcycled" Whiteboard

Well, after months and months of busy times, I'm back. I plan to write at least a few posts this summer to keep track of the projects I am working on. They will probably not be way too in depth, but perhaps they might provide inspiration for a project of your own!

The first real project I did this summer was "upcycling" an old Smartboard/Whiteboard to two smaller ones to use at home and in my classroom.

When Matt moved out of his old work office to a new one, they got rid of a lot of old things. One of those was a beaten-up, non-working, Smartboard-like whiteboard. Basically, it was a really large sheet of thin foam encased in two even thinner sheets of metal. On one side, there is also a thin layer of whiteboard material. So basically, it is a really early version of a Smartboard. I believe it could be used with a projector and the user could click on the screen, but instead of using the pointers to "write" on the screen digitally as Smartboards now do, the user could just use an Expo marker to write on the whiteboard part.

Matt rescued this board, which originally had thick metal and plastic edging and a tray for markers at the bottom. It was huge. He had to have his parents take it home for us in their truck. I do not have a picture of it before, but trust me, it was huge. Also one corner was bent.

We decided to recycle the perfectly usable (and free) whiteboard material and make two smaller boards. First, Matt had to get rid of all the edges, which was a little tricky. Once he did that, I had to cut down the gigantic sheet. I cut it in half using a jigsaw and a metal blade. It actually wasn't that hard to cut.

Once it was cut, I bought trim pieces that had an L-shaped back to make a frame for the boards. I painted the trim pieces a metallic color.

When they had dried, I "measured" them to fit around the board. By measured, I do not mean I used an sort of measuring tool. I hate measuring and it always comes out wrong. What I did was this: I cut one end of the trim to a 45 degree angle. I lined that up with a corner of the board and then marked a line where the other end should line up with the board. Then I'd use that mark to cut the other end. So, I was basically trying to custom cut each piece for the board, since I knew my cutting-in-half job was not perfect plus the board was slightly warped on one end. It did not come out perfect, but it worked pretty well and I was able to make all the edges line up and it was much quicker than using the tape measure.


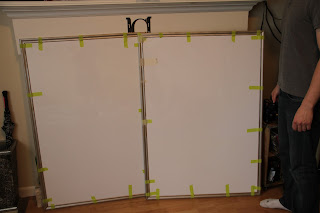
When all the trim was cut, I laid the whiteboards upside down, positioned the trim upside down around them, and used Loctite caulk to secure them to the edges as a frame. I used tape as my "clamps."


Finally, when the caulk had dried, I had two new, very cheaply recycled whiteboards for my classroom or at home! Right now, they are stored in my classroom since we don't have any room for them here. Here's a picture of them standing up, mostly dry, with Matt for comparison.


Materials Used:

One giant whiteboard (free)
4 pieces trim @ $5.44 each ($21.76)
Metallic spray paint (already had)
Loctite caulk (leftover from earlier project)
Jigsaw and metal blade (I did have to buy the blade, but it will be used again)
Tape (already had)

So really I only "spent" about $20 to create two whiteboards! Not bad, plus I used some leftover project materials that had been laying around. I am fairly certain that buying two whiteboards of that size would cost more than $20, plus I felt good about recycling instead of the board going to waste.