Wednesday, July 31, 2013

Fixing the Organ

We bought this organ for $80 at an auction. It is a Kimball reed parlor organ. Matt looked up the serial numbers on the back and we think the organ was made around 1895, according to the information we found.


Here are the things that needed to be fixed on the organ:
1. The Flute Forte and Treble Coupler stops did not work.
2. Two keys stopped playing at some point.
3. A rod hooked to the volume control rubbed a piece in the back of the organ.
4. The front piece of the organ leaned forward.
5. The biggest problem: the right pedal did not pump.

Here are the things that are now fixed on the organ:
1. All the stops are in working order.
2. All the keys play.
3. The volume control is adjusted
4. The front piece now stands vertical.
5. The right pump strap has been replaced.

That's right, everything on our organ is fixed! The best part is that everything was fixed by Matt and I -- well, mostly Matt, our the organ doctor. I called someone last week whose card we'd seen in Blackwater, Missouri, about coming to look at and possibly fix the pump on the organ. I was going to surprise Matt, but I ended up mentioning it to him and he said he really wanted to take a look at the organ to see if we could fix it first. We had seen a loose piece of fabric when we were moving it in, and we thought it might just be that the strap had broken and needed to be reattached or replaced. So, I said we could look at the organ and if Matt could fix the strap I would call the guy back.


On the night before Matt had to leave for a short business trip, we started looking at parts of the organ. We opened up the back of the organ first, where we could see the stops. The stops are the long black tubes. As you can see in the picture below, they have small wood strips coming out of them that attach to metal rods below the stops. When pulled out from the front of the organ, the stops pull forward those wood pieces that in turn press the rods forward a bit. The rods bend and connect to other wooden pieces and more rods in a maze that moves parts of the organ. For example, we later learned (when we removed the piece in front of the keys) that using the Flute Forte opens a slat that allows air coming from the bellows past the reeds to exit more easily, therefore making the treble end of the organ louder.

Treble-end stops from the back.

Far edge of the treble-end of the organ. See the rods?
Matt working on treble-end, using a shim to hold a rod in place.
So, to fix one of the stops, Matt had to put the wooden strip that comes out of the stop back over its rod. It just wasn't hooked over the rod, so it wasn't pushing the rod forward when we pulled the stop. Easy fix.

The second stop needed to have a shim put in the wooden piece that attached it to another rod that connected to the slats and workings at the front of the organ (sorry, I can tell this is getting ambiguous, but I don't exactly know all the correct terms, so I'm trying my best to identify pieces as best I can). The nut that held the rod to the wood piece at the back of the organ kept slipping and losing pressure, so Matt filled in the rest of the hole in the wooden piece to keep the rod in place and force it to push the connector forward when the stop was pulled out.

Front of organ without the decorative covering.
Whew, that was a bit confusing. Step two is easier to explain. After fixing the stops, we moved to the front of the organ. Matt removed the piece that hides the space under the keys. This is where we learned a lot about our organ!

We could see the reeds when pumping the bellows and watching very closely beneath the keys. Matt found the two keys that weren't working. On a low A, there was a spider sac in the way of the reed vibrating (gross!). On a very high E, Matt cleaned the reed with a Q-tip and that seemed to do the trick. Apparently enough dust can clog them up.


Wooden rods and metal strips beneath the keys.


After this, Matt was looking at the back of the organ again and noticed that a piece of wood was rubbing on the key-cover when the key-cover was pushed up. After a bit of following rods, we saw that the rod that connected to the piece of wood was connected on the other end to what we call the volume control paddles. The paddles are used with a player's knees. While playing, you can slightly shift the paddles. Then they will hit two metal rods sticking down from organ, right under the keyboard, and those rods will move and will do the same things the stops do, but for a temporary amount of time (as long as you hold the paddle there). For example, whereas having the Bass Coupler stop pulled out will make it so that every time you play a bass note a corresponding note of an octave lower will also play, using the volume control can activate the Bass Coupler in the middle of playing so you don't have to reach up and pull out a stop, or have the effect last the whole time. The paddles can also open up those slats that let out more air, which is why we call them volume control.

Anyway, the paddle and rod were not lined up right, but Matt shifted them so that the piece of wood in the back of the organ no longer rubs against the key-cover.

After this we made the front piece stand more vertically. Matt looked in the back and saw that a nail holding the façade forward was not pressing forward far enough, so he nailed it in a bit farther. That helped some, but the facade still leaned somewhat. So, we used some shims to try to hold it in place. This worked temporarily, but a few days later it shifted again a bit. We'll keep working on ways to make it fit perfectly. So, I guess that part is not completely fixed, but it is much better than it was.

All right, finally, the big fix!


Behind a part of the façade, showing the straps, uh, strap.
We found we could unscrew a part of the organ façade that was right above the pedals and have a look at the straps. The straps are pulled down when the pedals are pressed. They roll over a wooden roller and pull the bellows open, pumping air up past the reeds and making the organ play. One strap, as we thought, was broken. In fact, it looked as if the straps had both been broken at different points, as it appeared that someone had tried to fix them with overall straps! They were haphazardly sewn onto the straps ... but one was working, while the other had rotted and broken again.

By the time we'd fixed all the other problems, it was late on the night before Matt's trip, so we put off the actual fixing of the strap. But, since I was so impressed with Matt figuring out how to fix the other problems that I went ahead and called the organ man the next day and said we were going to try to replace it on our own first. When Matt returned, I had sewn two new strips with canvas I had, ready to replace the straps. We ended up only replacing the broken one, but I kept the other new strap for the future, in case the other "original" strap breaks.


That screwed wood piece attaches the strap to the bellows.
Matt pulled out the nail that held the pedal up. We used a compact mirror to look behind the pedal because it would not lift up high enough for us to see behind. Matt unscrewed the wooden pieces that attached the straps, we measured it out to match the other strap, and we screwed them back on with the new strap attached.


Pedal without strap attached.

Using the mirror to see what we were doing.

Attaching the new strap to the wood piece, then the pedal.

Screwing the strap to the bellows.


And there you have it, the organ is all fixed! We had a fun celebration of our accomplishment - kitty even got Fancy Feast - and we've been playing it a ton over the past few days. I still have to get used to pumping rather than just playing (not a piano!). Still, it is so exciting to have our organ fully working. When we first got it, we were not sure if it would work at all, and thought it might just have to be "furniture" for a while, but we are both so happy that it works and I am especially excited that Matt has been playing it so much. He really enjoys it and it is cool to see him teaching himself some songs.

Sunday, July 28, 2013

Thoughts on the "Royal Baby"

Have you seen this meme?


I'll admit, it is slightly humorous and I snickered when I first saw it. However, I completely disagree with its message of "not caring" about current events.

I saw one person on facebook say he was "patriotically avoiding celebrity news." I guess you could call Kate and William celebrities, as much as you could call the Queen a celebrity, or President Obama a celebrity. They are celebrities in the fact that they are famous/popular. But they are also current (or future) government leaders and representatives of their country. Though Kate and William may seem like just another celebrity couple to us, therefore making their baby news seem like an out-of-proportion fad, someday William will be King of the United Kingdom. After that, his son will be.

Just because we are no longer a colony of England we should not care about its future leaders? If we should not care about the future King of the United Kingdom, why do we care about the leaders of other countries at all? Why do we go out of our way to get rid the world of tyrants or encourage democracy in countries that we don't have as much of a tie to as England? For many of us, our ancestors came from England, and even if we are glad to be no longer a part of that country, to have our own government system, and to be "independent," does that mean we should completely ignore historic events that are happening right around us? That's what this moment is -- it is history. No, people in the United States won't be much affected by the birth of Kate and William's baby, and may not even be much affected when he actually becomes king, so no, we don't need to be obsessed with what is going on. But that doesn't mean we should not "care" or worse, be unaware of what is happening. I know it is hard to imagine anyone being unaware of what just took place overseas, but there are at least a few people I have heard about who have not been following (or been "forced" to hear) the updates on the situation.

Even after we gained independence from England, we were obsessed with what they were doing. When I was doing a project about Washington Irving in the spring, this became apparent. Read some literature from that time -- after the war of 1812 was over, and people could start travelling to England again, lots of writers visited "the land of their fathers" and wrote travelogues and other stories that focused on England. There was conflict between wanting to form our own nation and looking back to where we came from. We were glad for independence, but we used England -- reluctantly sometimes -- as a guide for how to start our own country. Not in regard to the government system, but in other ways. We still cared about what was going on there.

I think it is fine to care about what is going on in other parts of the world. In fact, I think we should at least KNOW what is going on in the world. Sometimes the United States takes actions in those other places that I think are overstepping our bounds or are completely wrong, but the actions we take aside, at least being aware of what is going on may help us be a little less self-centered.

Plus, do we say to other people: "Well, I'm not a part of your family, so I don't really care about your sister's baby?" No, we say: "Oh, that's nice that's she's having a baby, hope it all goes well." Even when we meet people we don't know in Walmart with little children, we act sweetly toward the kids when they wave or say hello to us, or we tell the moms how cute their babies are (well, some people do). A baby is a baby, something to be thankful for. My kids are likely not going to be awaited with bated breath and shown on the news, but they also aren't going to be future kings or queens. So, I'm cool with that, and I'm fine with "caring" about Kate and William's baby. The difference is "caring" versus being obsessed with it. It's fair for their family, and probably their whole country, to be very interested in the birth of a future leader. Probably not so justified for me. I'm not obsessed, but with a family member and a close friend both giving birth this summer, it is not like I'm going to say that the "royal" baby should not be celebrated just as much as I am celebrating the babies in my life.

One last argument I've heard: that the baby news has been reported before news about disasters or other more pressing situations. Probably news of the royal baby shouldn't be placed above certain other important news, but this news is also important -- it is future history, and it's something happy. How often to we get to hear about happy things in the news anymore? I for one am glad to have something to be interested in that is a good thing. That doesn't mean I will ignore or forget the bad things, but it makes for a balance, at least. 

Friday, July 26, 2013

Project: Styrofoam Cooler Ottoman

This one is a bonus project! It was not on my original list for the summer (but you can bet I'm putting it on there so I can cross it off!), but I was going to visit my friend Melissa and she had a project in mind and wanted me to try it with her. It is an idea you may have seen on Pinterest: making a heavy-duty Styrofoam cooler into an ottoman. Several other people have already blogged about it, but I'll share my experience, which was actually pretty easy. You can compare it to Melissa's when she writes about it if you want - she had a tougher time than me, but she did a lot more tricky things with hers, and it still turned out great.


The coolers: use the heavy-duty ones, like these Omaha Steaks coolers. I made mine "open-able" so I could use the storage space inside. So, I didn't put anything inside. If you don't want to do that, you can fill it with expandable foam or some old magazine for weight or stability.
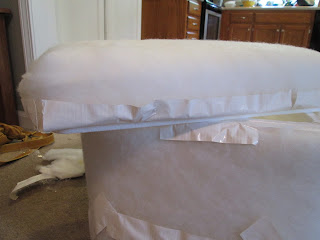
I used just a double layer of quilt batting to cover the sides of the cooler. I taped one edge then wrapped it around the cooler, and overlapped the bottom.  
Wrapped in batting that is taped down to hold in place for now.
I used staples (from a staple gun) to hold it down in some areas. It actually worked pretty well in most spots, but if there is much tension or thickness, then the staples come out fairly easy from the foam. But, for holding temporarily or in certain places that worked well.
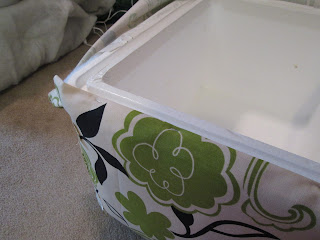
If you want the top to be removable, don't cover up the little groove! However, I did reinforce/hide the styrofoam edge a bit with white duct tape so when I open the box it is not as stark. I'm planning to line the cooler with something, too ... perhaps tape or fabric.
Top piece and bottom piece with batting. I also used some mattress foam (borrowed from Melissa) on the top so it would be extra soft. I taped it on and then covered it all with batting.
Finally, time for the fabric. I stapled it to one corner, then wrapped it, and taped it in place temporarily. 
Then I cut off the excess in the back, leaving enough to overlap enough and cover the bottom.
The bottom was one place where the staples wanted to pop back out, what with layers of batting and overlapped fabric to hold. So, I hand-sewed a few of the corners to hold the fabric in place. 
On the top, I folded under the edge and stapled it just up to the groove for the top. This part worked very well, actually. 
Bottom done!
Alternate color fabric for the top.
The corners were tricky but they ended up looking pretty good.
Done! I really, really like it. 
So, the fabric is from the home decor section of Walmart. It is "ticking," a little thicker than regular fabric and supposed to be "soil release" or some such ... meaning it was a bit expensive. My cooler was free (thanks friend!) but the two yards of patterned fabric was about $13 total and the one yard of plain green was $7 or so. Meaning I probably could have bought a cheap ottoman/footstool from Walmart for about the same or cheaper. However, it was fun to make, it is in the color I chose, and I have enough fabric left over for a few pillows, I think. If I end up making pillows, I'd practically have a whole room set for $20. THAT would be a pretty good deal.

The problem, though, is this: I tried to pick a fabric that would match with one of our rooms. When I got there, I loved the green leaves, and convinced myself it might go all right with our fancy chair in the living room that has a flower/leaf pattern. When I got home, I realized the greens were not the same green and the patterns don't really go all that well together. So, not sure where to put it now. There are really only three rooms the ottoman could go in and be useful: the living room, the library, or the "green room" (extra bedroom/storage/craft stuff room). So, I'm going to ask for your help on this one, readers!

Here is the ottoman in each possible room. Let me know in the comments which one you think it matches best with (or clashes least with). For now it is in the living room, but I'll see what you all think about where it should more permanently reside. 
  
Living Room. It would be nice as extra seating/footstool space, but we already have a long ottoman (moved out of the way at this point) and it really kind of clashes with the fancy chair, I'm afraid. Sad about that. Should have been wiser with my fabric choice.
Library. Though it doesn't really "match" with the green chair and leaf carpet (which really don't match in themselves), it possibly clashes a bit less, and could definitely be used as a footstool. Also, it is lighter than the small footstool I had previously had in there, so I could more easily use it to reach books on the top shelf (I think I can stand on it for a moment or two at a time and not break it . . . it is pretty sturdy and I am pretty light). 
"Green Room." I'm not showing you the entire room because it is A MESS. I can never get everything to fit without it being cramped and cluttered. I'm trying to work on organizing it and moving things around to fit all the craft stuff I have and my sewing machine in a place where it won't have to be moved after I am finished using it. So, I've just got the ottoman sitting on the bed here to show you the other colors - green walls and white/lilac pillows and white/blue/teal quilt. Not that you can really see the quilt because of the stuff on the bed. Sigh. Anyway, it probably "matches" best here, but I really don't think I would use it very much in this room, as I usually only go in there to grab an item at this point.
So, let me know what you think of the ottoman and where it should go right now, until we move into a new house someday and I make sure to paint and furnish a room with furniture that won't clash so badly so it can have a comfortable home. Thanks for the input!

**Last thought. If I do make pillows to match, a last option would be to move the fancy chair out of the living room, use the new ottoman and pillows next to our papasan (the white couch) and maybe using the longer brown ottoman on the other side as a seat. I'm not sure where I'd put my fancy chair though. It could go in the library . . . but it is really pretty and I like it in the living room. Anyway, just a possible option. Even if I can't get it to match perfectly now, I'm excited about this bonus project before school starts again, and knowing that if nothing else, in the future it can be a cute piece in our future home.

Wednesday, July 10, 2013

DIY Canvas Frame

I'm going to write another post soon sharing the project that required me to create a frame, but first I'd like to share with any readers out there how you can make your own frame for a canvas (or other "thick" piece of art with edges that can be nailed into) with trim, a nail gun, and a small saw. You will also need paint or stain.

Here is what I am talking about:


I painted this oil painting of Matt and I while in an art class at a community college. The art teacher showed me how to frame the painting myself fairly cheaply and easily.
Using two types of trim, you can create a frame for canvases that does not cover any of the painting. Depending on where you get your trim (and paint or stain), it can be fairly inexpensive. Not as fancy as having it professionally framed, but certainly cheaper, and makes your artwork look more polished than just hanging it without a frame. (Of course those canvases that are 2" thick are meant to be painted on the edge and hung like that, but they are also very pricey - if you want to get the thin kind, this can make the edge look finished.)

To prepare your trim:

1. You'll need two types. One type is pictured below. The other can be seen in later pictures. The first type of trim is skinny and will make an inside layer for your frame. I used a piece that is 6/8" wide and about 1/4" thick, and I luckily had several 4' long pieces leftover in our garage that afforded me plenty to cover my two smallish canvases. You want this trim to have rounded edges on one side. The second type of trim forms the outer layer of the frame. For the oil painting of Matt and I, I used trim that is 1 1/4" wide and 3/16" thick ... but for the current frame, I used pieces that were 1 1/4" wide and 3/8" thick, because that's what I had. This trim should have square corners all around. (Mine actually had one edge rounded since I was using leftovers again, but I hid it to the back.)

2. Make sure you have enough of it. To do this, measure all the sides of the canvas and add the lengths. For mine, a total of about 7' would cover it (two sides a little under 1 1/2', two sides about 2'). But, even if your canvas could be covered with one length of trim, I recommend getting two smaller pieces or two regular pieces and trying to use the leftover on something else. Now, if you are wanting to be most cost effective, one piece is going to be what you want, but my method of making a frame requires two pieces. You could also get one long piece and cut it in half. As long as you have a little extra wiggle room, this could work. Since I was doing two canvases, I needed two pieces of trim anyway, so I used both pieces to work on one canvas, then the other. This will make more sense in a bit when I explain how to create the frame without having to measure the trim!

3. Stain or paint both sides of all the trim pieces. Paint is easy and black always looks good, but I chose stain this time because I had some leftover Red Oak I really like and thought it would go nicely with the beige and blue in my picture.

     *SUPER AWESOME TIP FOR STAINING or using polyurethane: I HATE getting that stuff on my hands. When you go to wash your hands, it just gets even worse. Olive oil will get it off really, really magically. When staining the growth chart ruler, I went to tap the stain lid closed and the stain popped and speckled my arm like a cheetah. But, rubbing olive oil over it took it right off. After using the oil, wash a second time with soap to get the oil and leftover residue off.


Staining the skinny "inner" trim pieces.
To create the frame:

1. This is easier with a buddy. I had my dad help me. You'll need all your trim pieces, a nail gun (or, if you don't have one of those but can think of a different way that works for you, let me know!), and a small saw.

2. Lay one of the skinny trims on one edge of the canvas with the edge of the trim square with one edge of the canvas. You want the rounded edges to face AWAY from the painting. You can square the trim with the canvas edge using another loose piece of trim (now we are getting to why you want at least two pieces of trim). Make the front of the trim flush with the front of the canvas, or make the canvas stick forward a tiny bit if you prefer. Hold the trim aligned and attach it to the wood on the back of the canvas with the nail gun.


Shoot the nail straight down into the trim and through it to the wood strip that is the canvas backing. I like to use three nails - one per end and one in the middle - for this part.
Don't do this! Dad accidentally shot one at the wrong angle and it cut through the painting. Luckily, he was able to pull it back out and I smoothed the canvas back down. I will paint over it or mod podge the back of the hole to keep it from opening up. Angle the nails away from the front of the canvas!

3. Here's where that other trim really comes in handy. The first piece of trim should hang over the edge of the canvas (I used 4' pieces, so they hung off 1 1/2' to 2' extra). Leave that. Turn the canvas one rotation. Align the new piece of trim against the previous piece to make it flush. Nail it down.


4. Now, cut off the excess of the FIRST trim piece. Because you have a second piece in place, you can set your tiny saw against that and cut the trim off just flush without having to measure any lengths. Yes, there will be a cut end that you have to stain or paint later after lightly sanding, but that's pretty easy.


Cutting off excess of piece #1.
Another shot of the same task, with second layer of trim.
5. Use the newly cut piece to form the next edge. Same as before, align the trim piece you'll be adding against the piece that had excess hanging off. Leave the excess of what we'll now call piece #3.

6. Cut the excess off piece #2.

7. Use excess from piece #2 to add the final edge, following the same pattern. 

8. Once all edges have been covered, you should have two edges still with a small amount of excess hanging over to cut off (as long as your pieces were long enough to cover two sides as mine were ... alternately, you could use 4 very short pieces, just a little longer than each edge of the canvas, and the only cutting you'd have to do would be at the end to remove small excesses. Depends on how you want to do it and what you have to work with).

9. Once you have one layer of trim with all excess cut off, do the whole thing over with the second type of trim. Aligning this is a little more up to you, but you want at least a little bit of the trim to overhang on the FRONT of the artwork. You can try to center it on the first type of trim if you want, but since this requires a steadier hand and a lot of checking, my dad and I aligned the top layer of trim with the back edge of the first layer to give in a nice inset. It will go like this: Do piece #1, align #2 with piece #1 and attach, cut #1, attach #3, cut #2, attach #4, cut #3 and #4.


Aligning top later of trim with back of first layer to create an inset on the front.
Dad did all the nailing (except when my mom helped for a brief interval) because I don't like the nail gun.
10. Lightly sand and stain or paint the rough edges, and you are done!


That was a cut edge.
See the nice inset?
Both canvases.
I know these last pictures aren't nice full shot pictures, but since I'm planning to have another post soon focusing on the actual art itself, I didn't want to give it away too much - you can look for that post soon to see what I was working on (another project down!) and see the frame as it looks when the picture is hung and looking good. 

I hope this one was clear enough - I didn't get a ton of pictures during the process. It was really hot in my parents' barn and dad needed to go do something, so we went pretty fast. If you have questions about how exactly a certain step is supposed to go, let me know and I'll try to explain it more fully. 

Good luck if you try making your own frame this way!

Monday, July 8, 2013

Project: Cat Door

We finally put in a cat door for Llyr that will allow him to go into the garage whenever he wants. This will not solve all our problems of Llyr whining to go outside, but perhaps it will cut down the annoyance a little since now he can go out there (sometimes a satisfactory second option) on his own. Though each cat door is different and should come with its own instructions, I'll show you the process I went through to put ours in, as well as pictures of Llyr using it soon after it was installed. He is a smart kitty. 

We bought a small, cheap-ish cat door ($20) from Lowe's. There were a few options. I liked that this door had just a tiny bit of space around the door so it would swing open and closed easier. One of the models at Lowe's had a door that touched at the point where the magnet is placed to keep it closed, and it was harder to push open. I also liked that this one was pretty low-profile. There was another one that had edges that were really thin and bevelled to the door and a lock that could be made to allow the cat 4 different access ways ... but then I decided that simple was better and this one was smaller and would take up less room overall on the door, even though it sticks out from the door a half inch or so. 

There was a paper provided that had steps for installing the door. I thought this was really smart: the paper itself is what you trace around to cut the hole. I still measured a bit though. I measured roughly how far below the top of the door the hole would be, so I could make the top of the door line up with the bottom edge of the bevelled panel of the door. I really disliked that all the example pictures at Lowe's had the door cutting right through the panel - that just looks tacky. Luckily, our door was small enough that it could fit below the panel.


Measuring for placement.
Ready to trace for the hole. See the instructions?
It is light but you can sort of see my tracing.
 I used the same trick to cut out this hole in the door as I did when cutting the hole for the front of kitty's litter box.  I drilled out holes at the corner and used my jigsaw to cut it out. This was tricky because the door is hollow, so I had to keep drilling and get through both layers, then I had to basically do all the cutting with the door open because it was so near the floor the jigsaw wouldn't easily cut otherwise, and also the door wanted to shake a lot while I was cutting.


Drilled holes through both sides of door.

During jigsaw-ing. It made a mess of the paint.

After jigsaw-ing.

I tried placing the pieces on to test the cutting and see if Llyr would go through it. He was unsure what to do at first, but knew that he could push on the door. After a while of my lifting the door up and calling to him, he finally went through once with my help. Then I went back to affixing the door.

Another point I should mention is that it worked really well for us to put the door so close to the floor on this side because there is a step on the other side of the door. So, when Llyr is coming in from the garage, the door is at a great height. When he is going out into the garage, the door probably seems low when he first starts to go through, but then he steps on the garage step and can get down. If the garage floor was level with our kitchen/living room floor, my plan to put the door really low and miss the door panel would have made it so that Llyr had to crawl through, which would not have been as ideal.


I screwed on the front side of the door after peeling off a lot of the paint. The jigsaw really scraped it up a lot, so I decided I'd just paint over that area again with leftover paint. This door does not hold the paint we used very well - I'm not sure if it is the door or the paint (which makes an almost laytex-like layer) that is to blame. The back piece of the cat door (which is laying beside my in the previous picture) just had double-sided stickers to attach it to the back. Actually, this cat door was really simple to attach. Some of the others were adjustable to the door thickness but had a plastic part that went inside to cover the exposed door. That was neat, but then you had to cut that down to make it fit your door, which would have been a lot more work. When our cat door is open, you can see inside the hollow door. I could stuff or cover that somehow I guess if I wanted to, but I'm not too worried about it. I guess the worst part is that in the garage that hole is not covered, so bugs could possibly get inside the door, so I may try stuffing it up with something to prevent that.


Door attached, paint removed.

After repainting.

Kitty learning to use the door.
Success! Smart kitty!
And now, we'll never have to deal with this again:


He usually isn't that dramatic about getting in the garage, but this was just after we'd had the garage repoured and he hadn't gotten to go out there for a couple days. He was having withdrawals.