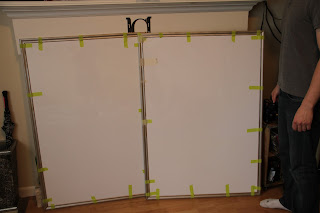
The first real project I did this summer was "upcycling" an old Smartboard/Whiteboard to two smaller ones to use at home and in my classroom.
When Matt moved out of his old work office to a new one, they got rid of a lot of old things. One of those was a beaten-up, non-working, Smartboard-like whiteboard. Basically, it was a really large sheet of thin foam encased in two even thinner sheets of metal. On one side, there is also a thin layer of whiteboard material. So basically, it is a really early version of a Smartboard. I believe it could be used with a projector and the user could click on the screen, but instead of using the pointers to "write" on the screen digitally as Smartboards now do, the user could just use an Expo marker to write on the whiteboard part.
Matt rescued this board, which originally had thick metal and plastic edging and a tray for markers at the bottom. It was huge. He had to have his parents take it home for us in their truck. I do not have a picture of it before, but trust me, it was huge. Also one corner was bent.
We decided to recycle the perfectly usable (and free) whiteboard material and make two smaller boards. First, Matt had to get rid of all the edges, which was a little tricky. Once he did that, I had to cut down the gigantic sheet. I cut it in half using a jigsaw and a metal blade. It actually wasn't that hard to cut.
Once it was cut, I bought trim pieces that had an L-shaped back to make a frame for the boards. I painted the trim pieces a metallic color.
When they had dried, I "measured" them to fit around the board. By measured, I do not mean I used an sort of measuring tool. I hate measuring and it always comes out wrong. What I did was this: I cut one end of the trim to a 45 degree angle. I lined that up with a corner of the board and then marked a line where the other end should line up with the board. Then I'd use that mark to cut the other end. So, I was basically trying to custom cut each piece for the board, since I knew my cutting-in-half job was not perfect plus the board was slightly warped on one end. It did not come out perfect, but it worked pretty well and I was able to make all the edges line up and it was much quicker than using the tape measure.
When all the trim was cut, I laid the whiteboards upside down, positioned the trim upside down around them, and used Loctite caulk to secure them to the edges as a frame. I used tape as my "clamps."
Finally,
when the caulk had dried, I had two new, very cheaply recycled
whiteboards for my classroom or at home! Right now, they are stored in
my classroom since we don't have any room for them here. Here's a
picture of them standing up, mostly dry, with Matt for comparison.
Materials Used:
One giant whiteboard (free)
4 pieces trim @ $5.44 each ($21.76)
Metallic spray paint (already had)
Loctite caulk (leftover from earlier project)
Jigsaw and metal blade (I did have to buy the blade, but it will be used again)
Tape (already had)
So really I only "spent" about $20 to create two whiteboards! Not bad, plus I used some leftover project materials that had been laying around. I am fairly certain that buying two whiteboards of that size would cost more than $20, plus I felt good about recycling instead of the board going to waste.


No comments:
Post a Comment