Thursday, June 9, 2016

DIY Real Wood Bookcase for Under $150 in 5 Steps

It has been almost a year since we moved from our small house in town to our only slightly bigger house in the country. The old house was already overflowing with books despite the great 4' wide by 8' tall built-in bookcase my parents built for us when we moved in. Obviously, that bookcase couldn't come with us. Four new bookcases later (plus the few small ones we had and could take with us), all of our 1422 books (as of June 8, 2016) are FINALLY unpacked. 

When we first moved in, we considered buying barrister bookcases (still want one someday), but they are extremely expensive. For good reason, but still ... here's an example of a real wood barrister:


Almost $1000, yipes! We did some shopping around and prices vary some, but it seemed like most of the single boxes were at least $150-$200 each (and then you just get as many as you want to stack). 

So then we considered an MDF barrister like this one:


Much better price ... but we hate MDF. Did you know that for a 3' wide bookcase, MDF can only hold about 9 pounds before it starts to sag? That just wasn't going to cut it for the amount of books we have. 

Then we considered building our own barristers, using this really handy guide:

There is a really helpful PDF on the second page of the website. If you are into woodworking and a little better than beginner, you could do this project. We looked at costs and thought we might be able to make this bookcase for around $400 (total for a 4-shelf case). We didn't factor glass costs into that, though. Still, it would have been a much better deal than any real wood versions we'd seen so far. BUT - I thought it would be a little too difficult for me and time consuming. It was the middle of the school year and we needed something quick so we could unload at least a few of our boxes of books. I wanted something simple.

So, I designed a much simpler bookcase and now we've made four of them. 


INSTRUCTIONS FOR BUILDING A SIMPLE BOOKCASE
(P.S.: a Kreg jig is essential to these instructions)

*Note that we used cheap boards from Lowes. I think the bookcase still looks nice, but with more costly/better boards, it could look even more professional. Also, if you don't hate sanding as much as me and you really sand down the tops of the shelves or put second coats of polyurethane, that could make it look more sleek. 

**These materials and instructions are for a  3' by 6' 4" bookcase with 4-6 shelves. It should be easy to adjust the dimensions to fit your needs; just factor in whether you need more or less wood. 

Materials:
Three 1x12x6 Whitewood Boards
- Use: sides, top, and bottom of bookcase
- Cost: $9.98 per board ($29.94)

Three 1x10x6 Whitewood Boards
- Use: 3-4 adjustable shelves and 1 stationary shelf
- Cost: $6.92 per board ($20.76)

Three 1x2x6 Whitewood Boards
- Use: shelf front trim/enforcers for 4-5 shelves
- Cost: $1.48 per board ($4.44)

1 Sheet 1/2 inch or 15/32 4' x 8' sheeting or some other plywood
- Use: backing for bookcase
- Cost: $18.67 for one sheet
* Note: we bought 3/4 inch sheets the first two times. That made the bookcases immensely more heavy than when we switched to 1/2 inch. Also, this is one place where you could spend more for it to look better, maybe with panels or something? The sheeting is not the prettiest, but it is also mostly covered by books in our bookcase.

Optional: 4 pre-made legs
- Use: legs so your bookcase doesn't just sit on the floor
- Cost: the "Portsmouth Bun Foot" I bought costs $6.98 per foot ($27.92 total) and is almost the most expensive part of the bookcase. It would be way less costly to build legs ourselves ... but I like how they look and don't want to go to that extra work. Since the rest of the bookcase is pretty inexpensive, I feel okay splurging on those legs. It is kind of ridiculous that they cost THAT much. 

32oz of Stain (we got Red Mahogany Minwax)
- Use: for color and to hide imperfections. Dark stain is good if you are using plywood for backing since it hides a lot of the not-pretty-parts of the plywood.
- Cost: $7.77

32oz Polyurethane (we got Minwax Semi-Gloss)
- Use: to seal the bookcase
- Cost: $10.77

A KREG JIG and screws for it! This design uses primarily Kreg screws plus about 20 regular wood screws for attaching the backing. 

Adjustable Shelf Supports (4 per adjustable shelf)

Total Cost:
Wood: $73.81
Stain/Sealer: $18.54
Legs: (optional) $27.92
Minimal cost for screws and shelf supports

Grand Total: $92.35 - $120.27

All right, now to the instructions! I just wanted to prove to you that it was worth it with the cost analysis.

Steps Overview:
1. Cut and Assemble the Bookcase Frame
2. Cut and Attach the Backing/Legs
3. Cut and Assemble the Shelves
4. Drill the Adjustable Shelf Holes
5. Stain and Seal

Steps 1-4 can easily be done in one day if you have all your materials and you start early. You can even stain at the end of the day if you get that far. If your drying conditions are ideal, putting on the polyurethane on day 2 makes this a quick weekend project. After that, you just need to wait a couple of days for the polyurethane to completely dry and out-gas before bringing the bookcase into your home to fill with books!
 

STEP 1: Cut and Assemble the Bookcase Frame

Sides: Cut two of the 1x12x6 boards to 71" for the sides of the bookcase. (Ok, I don't really know why I did that in the first place ... I think to shorten it since I'd be adding legs. But really, if the ends are not damaged at all, you could just leave it at 6'.  Or, if you want the bookcase to be no higher than 6', then you could cut down the sides so that once you add the legs, the bookcase is 6' tall from the ground.

Top and Bottom: Cut the remaining 1x12x6 board into two 35" pieces. Make sure to look over the boards thoroughly to decide which sides will be the inside and outside faces. Remember that the top and bottom outside faces won't really show.


Use the Kreg jig to attach the top and bottom INSIDE the sides. I use three Kreg holes on both ends of one side of the top and bottom pieces. The ones on the bottom piece end up being covered by books and the ones on the top hardly show. You could also fill them with Kreg hole fillers. I assemble the bookcase with the back side up so that when I go to attach the backing, it is already in the right position.


STEP 2: Cut and Attach the Backing and Legs

Even though you know the measurements of the outside edges, MEASURE AGAIN ANYWAY. Sometimes the cheaper boards are a little warped in the middle along the side edges, so measure corner to corner mainly. 

Cut the backing board to fit. For my bookcases, my measurements are always 71" for the sides and 36.5" across the top/bottom (my 35" cut plus 1.5" for the thickness of the side boards). I use a chalk line to mark the plywood then cut it with a jigsaw. That part is not fun since the piece is so big and you don't want wobbly edges since it will show when you are looking at the back edge of the bookcase.

Lay the backing over the frame. Align the corners and attach one of them first using regular wood screws. After one or two corners are attached, you may have to push straight any bowed sides to align them. Once, when we had a side piece bow inward, we had to cut a piece of wood and lay it inside the bookcase before putting the backing on to push out the side so it would align to the backing. 

We usually use 7 screws along each side (counting the corners) and 5 along the top and bottom (counting the corners), or about 20 screws total.


To attach the pre-made legs I bought, which have a screw already attached to the top, I measure in 2" square on the bottom piece at each corner. Drill a hole to fit the screw (I think they are 1/4" thick). Be careful not to drill all the way through the bottom board! Then screw in the pre-made leg. Now you can stand up your bookcase. 


STEP 3: Cut and Assemble the Shelves

Cut as many shelves as you would like from the 1x10x6 boards. You could just buy two of these boards if you want just the bottom shelf and 4 other shelves. To get 6 or 7 shelves, you'll need three of these boards. 

Basically you need to cut the shelves to fit inside the case frame, so for my bookcase they need to be 35", the same length as the top and bottom (since those fit inside the sides). HOWEVER, depending on what kind of shelf supports you buy, you will probably need to cut the shelves slightly shorter, except for the stationary shelf.

For the stationary shelf, cut the shelf the same length as the top and bottom. For each shelf, you will cut a piece of the 1x2x6 board to the same length as the shelf and attach it with Kreg screws. This adds support to the shelf so it won't sag, and it also looks nice in the bookcase. For the stationary shelf, you'll also make Kreg holes on the short sides of the shelf to attach it to the inside of the bookcase for support.


Decide where you want the stationary shelf to go, mark it, and make sure it will be level. I put mine around 42" from the inside bottom of the case frame. Attach it to the sides with Kreg screws. If the back of the bookcase isn't perfectly flush with the back of the stationary shelf, you may want to use regular wood screws to attach it from the back as well. Measuring that is a little tricky, but I have done it on all the bookcases and it helped. I suppose you could also use the Kreg jig for that too, if you think ahead about that and remember to adjust your Kreg jig for the thinner plywood backing.


For adjustable shelves, cut the shelves slightly less than the inside width of the bookcase. My shelf pegs look like this: 

So I have to account for a decent amount of space for the shelf to slip over the edge of the peg (like, maybe 1/8 to 3/16 of an inch total). I always have trouble cutting the shelves slightly too long and it is really frustrating to have to go cut them again later. Make sure to test the shelves before staining!

Add front trim to the adjustable shelves just like the stationary one.


STEP 4: Drill the Adjustable Shelf Holes

This part gets its own step because I dislike it so much. When it is over I feel like I am "home free" on the project. 

I have made a measuring "jig" for these holes but somehow they still always come out slightly off, or the drill slips a little and the hole isn't exactly level ... they are a pain. But, so far the worst ones were fixable by putting padding on my shelf pegs to level the shelf. Not ideal, but an okay fix. I drill holes every two inches starting 8 inches from the bottom of the case and 8 inches from the top of the adjustable shelf. I drill the holes at about 2 inches and 8 inches from the back of the case. My holes are 1/4" to match the pegs, and I use a peg to test the depth of each hole after I've cut them all, deepening any that need it. Again, be careful not to cut all the way through the side!


STEP 5: Stain and Seal

Whew, by now, you are probably tired of this project and ready to be done if you are anything like me. I just want it finished so I can put my books on it! 

Stain the bookcase. I use a rag to wipe on the stain. I stain everything except the bottom since the bookcase is upright and too heavy for me to want to lay it over just for that. The legs can be tricky if you buy pre-made fancy ones like mine that have grooves. Also, the backing sucks up a lot of stain, but 32oz is always more than enough. I think you could maybe do two bookcases with that much, actually.

The  trickiest part here is staining the adjustable shelves. I use these little pyramid-shaped stands to sit the shelves on. I stain the backside, wait an hour or so, then flip it and stain the top. Since the pyramids only touch at a few points, it doesn't mess up the stain too much even if it is still damp.

Wait at least overnight until the stain is dry, then brush on your preferred polyurethane. Again, you'll have to do the adjustable shelves in two stages. Be careful not to overdo it on the polyurethane here .... when I did some of my shelves, the poly made my stain run a bit and make "drips" on the front edge of the shelves. 

Now, all you have to do is wait for the bookcase to dry and out-gas.

Here are all four of our bookcases in action:


Friday, February 19, 2016

Captain Ahab and Sea Soccer

Several weeks ago my husband and I went to watch his younger brother's soccer game. At one point my husband told me that one of the coaches reminded him of Captain Ahab. I looked up to see what he was talking about.
     Across the field was a tall, sturdy guy with a mid-length, thick white beard and a beanie cap. The most striking similarity, though, was his voice. Imagine the best gruff, pirate-esque, whaling vessel captain imitation you've ever heard. That was his voice. Before the kick, when it was the opposite team's turn to kick: "Get the ball, red team!" As the kids were running after the ball: "GET THE BAAALLL! [argh, mateys!]" I can't really remember anything else he said, but with the looks and voice paired with the umbrella he held beside him that called to mind either a cane or a peg leg, I could totally see the resemblance.
     "He must have retired from whaling and decided to do this instead," I joked.
     "Argh, mateys, when I was at sea, we played soccer on the deck! And when the ball was kicked out of bounds, ye had to walk the plank to get it!" my husband whispered in a pretty good imitation of the Captain. "There was no throwing it in, you had to swim it in!"
     I laughed. He went on throughout the rest of the game. "Ol' Johnny had a peg leg, so he had to be the goalie. We gouged out a little hole for his peg so he could stay in one spot and pivot to block the ball, argh! And when he'd get to whirling, there was no way to get the ball through, argh!"
     We went to another game the next week and he actually said "Argh" when he was calling out to a player who had missed the ball.


Wednesday, June 10, 2015

Summer Project: Holo the Wisewolf Pink Blouse

Part 2 of my Holo costume is complete: the pink blouse, as seen here:

https://theproductofprimes.files.wordpress.com/2012/05/holo-1.jpg

I used this pattern, which I got for ONE DOLLAR at that Jo-Ann's sale I mentioned


https://s-media-cache-ak0.pinimg.com/236x/0f/0b/28/0f0b2859c73e351ed9c0904f75283208.jpg

I picked this because although I found a cosplay site online with basic pattern sketches, I work better off of actual patterns most of the time. I saw that this "easy-to-sew" pattern had a 3/4 sleeve version that would be close to the style of Holo's shirt. Holo's shirt technically just has one front piece instead of the several pieces sewn together that this pattern has, but since I made them all the same pink, I think they don't stick out too much.

The only thing I don't like about these "simple" patterns is that sometimes they don't include directions for lining and they leave some inside seams raw. I don't like that because they can fray, but for now I just followed the directions. Maybe I'll get some iron-on tape or something and cover them later. A serger would probably also be helpful to fix those.

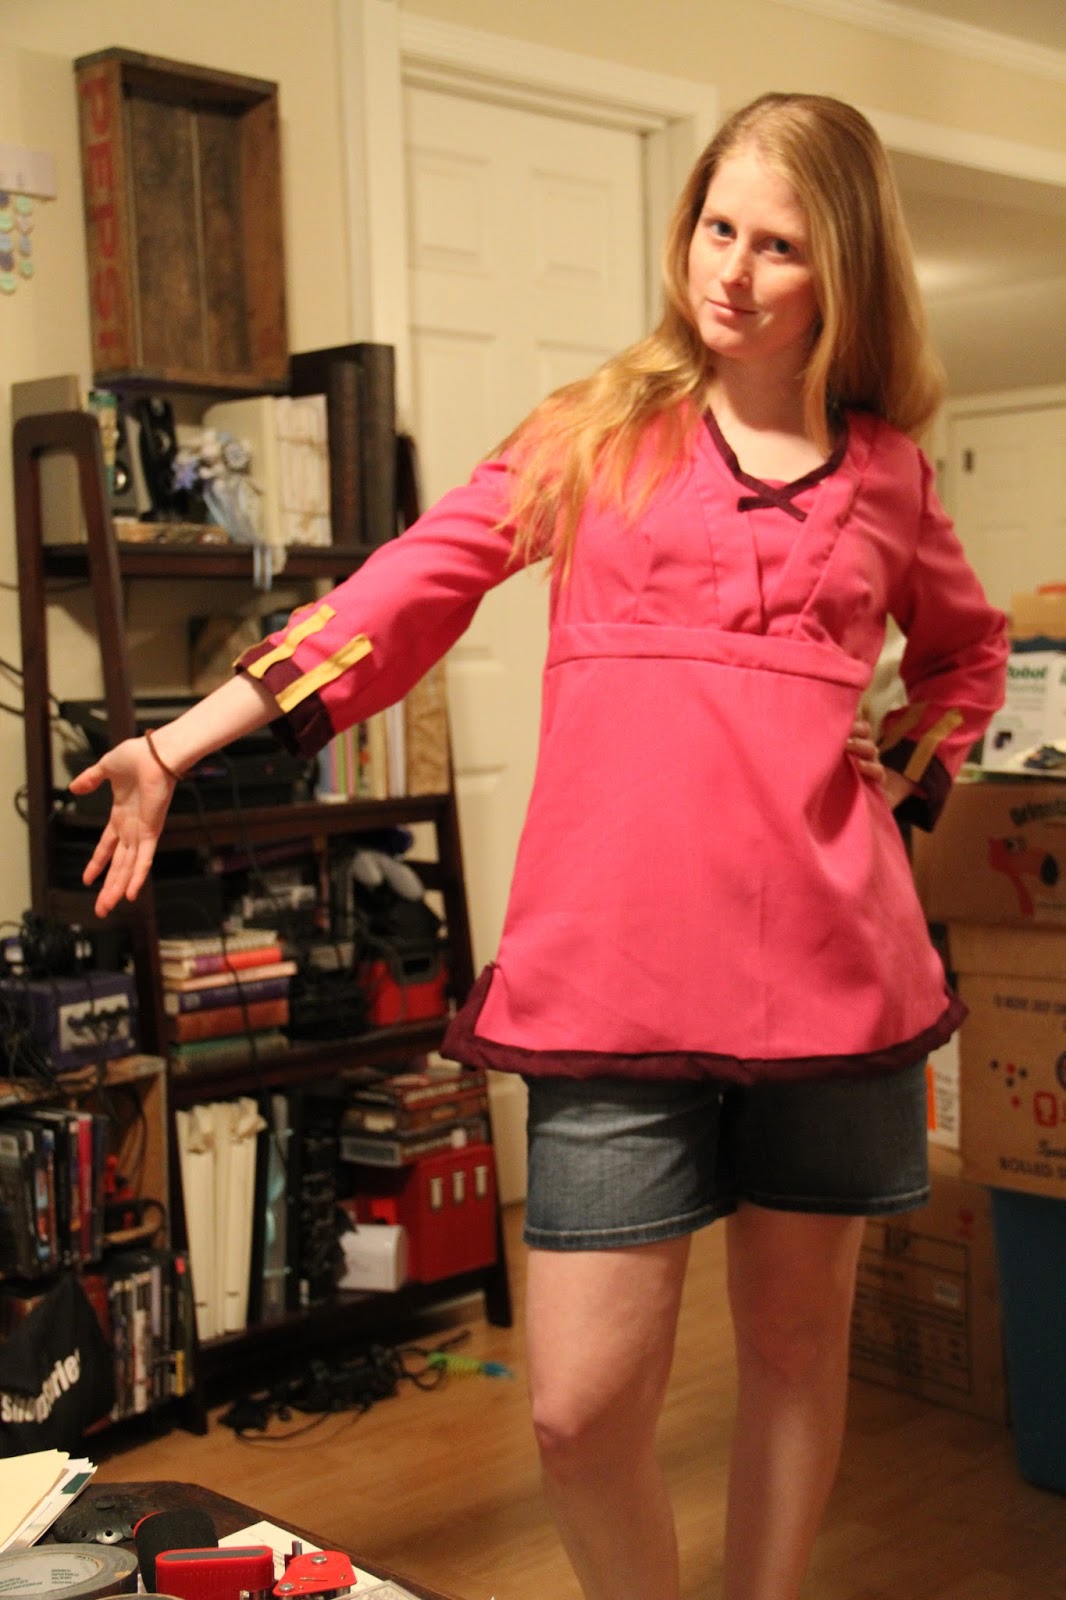
Here is the finished shirt:


The neck part is not exactly like the real shirt, but I think the rest is pretty darn close!


 Materials Used:

Wuji Very Berry Amaretto fabric. I bought 3 yards on sale at $5.99 a yard, but I probably only used about 1.5 yards. I wasn't sure when I bought it how much it would really take. So, I probably spent about $8 conservatively on the pink fabric that I actually used for the shirt.

I used a little of the Wood Potent Purple Solid fabric which I mentioned in the previous post about the cloak. I bought 2 yards and have probably used 1 or less so far in trimming. It was also on sale at $5.99 a yard, so we'll say I have spent about $6 so far using that between the cloak and shirt.

I already had the golden ribbon for the sleeve detail.

Total: about $15 or less for the shirt

Now I just have to make pants, the pouch, the belt, a tail, and ears, and the costume will be done. I will get back to you when I'm done with the next step!

The Cat Who Came Back

Once upon a time, there was a small family who lived on a street in town. There was a woman, a man, and a cat named Llyr who lived with them. The couple really loved cats, but their house was very small, so they couldn't get another inside cat to be friends with Llyr.

One day, a few friendly neighborhood cats started showing up on the couple's porch. There were only a few at first. The couple really loved cats, and the cats looked very hungry, so they gave the cats some food on the back porch to encourage them to stay in the backyard, away from the dangerous road where cars drove too fast and away from other neighbors who did not like cats so much.

Eventually, five cats were eating in the couple's backyard! There were the girl kitties -- Snubs, Gray Calico, Chinstrap, and Littles -- and one boy kitty -- Dan. Snubs and Dan were very, very friendly and wanted to move inside with the couple, but there was not enough room, so they had to live outside. However, they came up to get pets every morning when the couple put out food for them. The other girl kitties were shy. They ate a little food, but didn't like to be pet as much. Llyr was happy because he could watch his friends play outside and, sometimes, he could go out and sniff them before playing in the grass. Snubs and Dan always rubbed up against Llyr to show that they liked him, too.

One day, the couple noticed that the girl kitties looked like they were going to have kitties of their own! The couple was worried about how many kitties there would be on the street. So, they took Dan to the clinic to have an operation so that there would be fewer kitties in the future. The couple decided they'd take some of the other cats after their kitties were born and old enough to take care of themselves. When Dan went to the clinic, the vet said that Dan had a slight problem with his heartbeat, and it could cause problems during his operation. The couple was really scared for Dan, but they told the vet to go ahead.

Dan made it through the operation perfectly fine! The couple was so happy because Dan was such a nice, loving outdoor cat and now he could protect his cat family without making a lot more kitties. Dan was really brave and nice throughout the whole process. He was a trooper.

Over the next month, kitties started to be born! Snubs had two gray kitties that she eventually brought out on the back porch. Some of the other cats had kitties, too, but they were born in other places, so the couple did not see them for a while. There were getting to be too many cats on the back porch. Then, the couple found a new home in the country! They planned to move to their new home in a month and they were very happy because they knew Llyr would love the new home, and now all the outside kitties could come live in their barn and be safe from the road and not bother anyone.

Then, one night a few weeks before the couple was going to move, three new kittens appeared on their back porch! They were Chinstrap's calico and orange kittens. The couple said hello to them and put out some food for their mama, then went to bed. There were now 10 cats outside! That was a lot of cats ... but the couple was sure they could move them all to their new barn, where they'd be happy and safe and they could hunt for mice.

The next morning, Dan and Gray Calico were nowhere to be found. They didn't come for breakfast and did not show up all day. The couple was really worried about them. They called the shelter and talked to some neighbors, but no one had seen them. The couple was so sad. They were afraid the cats might have been hurt or taken away just before they got to move them to a new, safe home.

The next day, there was a different big male cat that scared the mama cats on the back porch. Snubs hissed and hissed to keep it away from her babies. The couple shooed it away, but they were extra sad that Dan had disappeared and now his kitty family had no one to protect them.

Then, the next day, Snubs disappeared, too. Three big kitties were gone suddenly and the couple didn't know why. Luckily, Chinstrap took care of not only her three kitties, but also Snubs's two bigger kittens as well.  Now there were 5 kittens and only two mama cats: Chinstrap and Littles (who did not have kittens yet).

The couple became more and more sad. Their kittens and mamas were safe, but they were sad about the three big kitties that had disappeared, especially Snubs, who was a mama, and Dan, who was so, so friendly.

Then, one morning, a few days after the cats had first disappeared, the woman went out to feed the remaining cats. After Chinstrap and Littles and some of the bigger kittens started to eat, another cat jumped over the fence and ran up alongside them.

It was Dan!

The woman was so happy, she ran in to get her husband and show him that their beloved Dan was back. Dan seemed healthy and fine, and he started to eat like he'd never left. The couple was overjoyed and showered Dan with love. Now the big daddy cat of the cat family was back to protect his kitties! The couple still did not know what had happened, but they were so happy that Dan had found his way back. They still missed Snubs and Gray Cali, but they hoped that maybe they'd return, too.

The couple was so excited that one of their missing cats had come back.

Tuesday, June 2, 2015

Summer Project: Holo the Wisewolf Cloak

Matt and I started watching "Spice and Wolf" earlier this year and we are hooked. We've now watched all the episodes of the anime and I've read up to book 8 of the light novels. They are so great! For Halloween this year, I think we are going to try to dress up as Holo and Lawrence, which calls for some costume making this summer!

I will be making Holo's "pink blouse and brown cloak" outfit:


So far, I have made the cloak:


Here is the pattern I followed, with some adjustments to the hood to make it look like Holo's which is connected in the front to form a sort of cowl. This is a really, really easy and fast pattern for a cloak, especially if you get a material that does not need a lining and won't unravel at the edges. My cloak could probably have a lining, but since the front edges happened to end on the selvage edge, I think it will be ok for a while without anything else, just one layer.

 
My attempted cowl was make by using the hood pattern piece but cutting it out with an extra piece toward the front to sew together and form a connected hood. It does not exactly stand up like Holo's cowl does, and also, it just BARELY fits over my head since it cannot dis-attach and open up like a normal cloak. I may have to do some cutting and adjusting in the future. But, a benefit of this is that there is no need for a clasp or tie. Slip it on and it just stays!

 
I trimmed the cloak with some maroon material, but the rest of the cloak is made from a heather brown "suiting" material, so it's fairly thin and light.


Materials Used:

Wuji Brown Heather Solid, 4 yards at $4.19 a yard: $16.76 plus a little extra for the hood. They only had 4 yards whole, and I was worried this would not cover it since the cloak technically calls for about 6 ... but I'm small and it turned out ok. I bought some "end of bolt" pieces, one of which I used for the hood, just in case. They were very cheap.

I also used a teeny bit of Wood Potent Purple Solid. I bought 2 yards at $5.99 a yard, but it was basically negligible for this project, and I'll use the rest for other parts of the costume and add it in there.

Total Cost: about $18

Fabric prices are high, especially suiting, to which I have recently been drawn. But luckily, during my stop at JoAnn's on the way to State Track to watch a friend run, they were having a Memorial Day 40% off sale! I saved over $10 on the brown suiting. It was going to be a fairly expensive cloak anyway unless I got really cheap fabric, since it calls for so much, but I felt like I was able to get a fabric that I liked and though it was definitely a splurge day buying fabric (I spent $75), I felt a little justified since I have this great costume in store and I also did save a lot ($99 overall!!). They were having a sale on patterns, too: up to 5 for $1 each. SERIOUSLY! I bought three. That's where I saved the most money, and was able to finally get the awesome Elizabethan dress costume I've wanted but refrained from buying since it is normally $17 just for the pattern (yipes).

Anyway, got off on a tangent there, but I will keep you updated on how the rest of the costume turns out for anyone who might be interested! 

Kitties at our House

I just want to share some lovely kitty pictures for your enjoyment. As well as our lovely Llyr, some other cats have been hanging around our house this summer.

This is Dan. He is the main guy who hangs out - mostly in this flower pot or crying at the back door for attention. Really, he is a sweetie. He lays down and actually likes it when I pet his belly, which he shows off by curling around my hand and forcefully pushing his head against my hand for more pets. We had him fixed a month or so ago even though he is an outside cat to try to prevent too many more kittens from appearing, and man, he was a trooper during the whole thing.


 This is Littles. She is pretty skittish, but so pretty! I finally got to pet her a little recently.

This is Snubs (because of her squinty-eyed look that makes her nose look snubby) and her little kittens! They are adorable. The mostly hiss at me when I try to touch them, but if I pet them, they don't protest too much more than that. Snubs is so sweet and little. 


Dan and Littles thought this mat I set out while cleaning the garage was for them to nap on.


"Upcycled" Whiteboard

Well, after months and months of busy times, I'm back. I plan to write at least a few posts this summer to keep track of the projects I am working on. They will probably not be way too in depth, but perhaps they might provide inspiration for a project of your own!

The first real project I did this summer was "upcycling" an old Smartboard/Whiteboard to two smaller ones to use at home and in my classroom.

When Matt moved out of his old work office to a new one, they got rid of a lot of old things. One of those was a beaten-up, non-working, Smartboard-like whiteboard. Basically, it was a really large sheet of thin foam encased in two even thinner sheets of metal. On one side, there is also a thin layer of whiteboard material. So basically, it is a really early version of a Smartboard. I believe it could be used with a projector and the user could click on the screen, but instead of using the pointers to "write" on the screen digitally as Smartboards now do, the user could just use an Expo marker to write on the whiteboard part.

Matt rescued this board, which originally had thick metal and plastic edging and a tray for markers at the bottom. It was huge. He had to have his parents take it home for us in their truck. I do not have a picture of it before, but trust me, it was huge. Also one corner was bent.

We decided to recycle the perfectly usable (and free) whiteboard material and make two smaller boards. First, Matt had to get rid of all the edges, which was a little tricky. Once he did that, I had to cut down the gigantic sheet. I cut it in half using a jigsaw and a metal blade. It actually wasn't that hard to cut.

Once it was cut, I bought trim pieces that had an L-shaped back to make a frame for the boards. I painted the trim pieces a metallic color.

When they had dried, I "measured" them to fit around the board. By measured, I do not mean I used an sort of measuring tool. I hate measuring and it always comes out wrong. What I did was this: I cut one end of the trim to a 45 degree angle. I lined that up with a corner of the board and then marked a line where the other end should line up with the board. Then I'd use that mark to cut the other end. So, I was basically trying to custom cut each piece for the board, since I knew my cutting-in-half job was not perfect plus the board was slightly warped on one end. It did not come out perfect, but it worked pretty well and I was able to make all the edges line up and it was much quicker than using the tape measure.


When all the trim was cut, I laid the whiteboards upside down, positioned the trim upside down around them, and used Loctite caulk to secure them to the edges as a frame. I used tape as my "clamps."


Finally, when the caulk had dried, I had two new, very cheaply recycled whiteboards for my classroom or at home! Right now, they are stored in my classroom since we don't have any room for them here. Here's a picture of them standing up, mostly dry, with Matt for comparison.


Materials Used:

One giant whiteboard (free)
4 pieces trim @ $5.44 each ($21.76)
Metallic spray paint (already had)
Loctite caulk (leftover from earlier project)
Jigsaw and metal blade (I did have to buy the blade, but it will be used again)
Tape (already had)

So really I only "spent" about $20 to create two whiteboards! Not bad, plus I used some leftover project materials that had been laying around. I am fairly certain that buying two whiteboards of that size would cost more than $20, plus I felt good about recycling instead of the board going to waste.

Friday, December 5, 2014

A Good Day As a Teacher

A lot of the time, it is tough being a teacher. I generally lean toward seeing the negatives more easily than the positives and I worry a lot, so the bothersome or cruel things that students say and do often stand out to me more and have a bigger impact than the kind or awesome things that I see every once in a while. But today, a student said something that made all those negative things (and all the stress of my first year last year) worth it.

I brought my Thesis (well, technically my "Research Question," but trust me, they are basically the same) to school with me because I was going to drive to my college and hand it in to my advisor right after school. Also I wanted to show that 31-page, 29-source bad boy to my students so they'd understand why I am not very sympathetic when they complain about writing 3-page essays and having to use MLA format.

When I showed one class, the kids started asking about my Master's degree, since I told them I'd be graduating next week. They wanted to know if I'd make more money with that degree. I said yes, a little more. They also wanted to know if I wanted to teach college and if that was why I was getting the higher degree. I said that I had thought about that some and might in the future someday, but that I really just wanted to get the Master's for myself, and that I preferred teaching high school to my time as a graduate assistant because I got to make relationships with the students.

To this, one of the girls said, "Well, you at least have to stay here until I graduate. That's just two more years. You can't leave before then."

I told them I could probably last at least that long. ;)

This comment really made my day. I can remember last year when one of my favorite teachers from my own time in high school was retiring. Several students tried to persuade him to stay by saying, "Just stay a couple more years until I graduate! I want to have you as a teacher again." All last year, perhaps because it was my first year and I was extra self-conscious, and perhaps because I was not as good then at dealing with unwanted behaviors of students, I felt that probably more of my students would rather have had me leave than stay. This year, things are much better, but it is still rare for students to say aloud things like this that clearly mean: "I like you. I want to be taught by you." Even though I'd like to imagine myself as tough, caring more about effectively imparting knowledge to students than whether or not they like me, I realize that students respect teachers more if they like them, and are much more willing to learn from them. Not every student will like me, and I know that types of students come in waves and I will probably have tough years in the future. However, it is nice to know that at least some of my students appreciate me as a person and a teacher.

Oh, that same student, upon hearing that the topic of my Thesis was dystopian fiction, wanted to read it. She loves books like Divergent and I mentioned that I wrote about books that had come before that one - classic dystopias like 1984. She insisted she was sincere in wanting a copy, so I printed one for her and she seemed really excited to read it. I asked her not to judge me if it was boring to her, but secretly I hope she'll like it and maybe even decide to try reading one of the novels that forged the way for modern dystopias like those by Veronica Roth.

Friday, July 11, 2014

The Story of Matt's Lost Ring

I'm going to tell you a crazy story about Matt "misplacing," as he calls it, his wedding ring, and then finding it again. Let me preface this with the story of why our rings are extra special to us, and you will then understand my feelings during this ordeal.

Matt and I made one another's wedding rings. We are not jewellers, and therefore we've had a couple of ... difficulties with this decision, but I'm still glad we did it. The rings were perfect for our wedding day, and I'm dealing with any imperfections a little better now than I did when they first occurred (I'll get to this later).

Matt made my ring from palladium, which is VERY sturdy, but very hard to work with. The solder he used was also difficult to work with. He started on the ring more than a year before we got married and finally gave me the finished ring two days before our wedding. The ring is a band with a rose-like flower that holds the diamond. It is modelled after a ring of my grandmother's. The way he chose to create the ring called for a lot of soldering of small parts together, and it was tedious and did not always go as planned. Until he started putting all the parts together, I wore the band as an engagement ring. But when it was done, it was gorgeous and very special. Worth the wait (like Matt ;) ).

I am even less skilled at making metal things than Matt, so I made his ring from iron in his grandpa's shop. He helped me cut a thin strip which we then hammered on the anvil into a circle, ground smooth, and soldered the thin opening between the two ends. It's nothing fancy, but it was something I could make.

Here are the rings on our wedding day:


As I said, they were perfect for the wedding, but mine was just not as sturdy as it needed to be for everyday wear. Really, the only actual thing that went wrong on it's own was that the diamond was loose within the prongs and after about a month, it fell out. Luckily I found it in the house right away. We left the diamond out for a while, but when Matt tried to put it back in and hammer the prongs down (with tools made for doing this), the prongs came loose from the solder joint. In trying to solder the prongs back in later, the rest of the solder melted (you have to get it EXTREMELY hot to solder it, and it is hard to pinpoint one small area on something already so small), and the rose became unattached from the band. For a while, I've been wearing just the band and we've decided to wait before trying to put it all back together because it is difficult with the materials Matt has, and also stressful. I think he wants to try something new in the future, and we've discussed getting a ring made to look very similar from a professional near our next anniversary. I'd be a bit sad not to wear the ring HE made for me, but I'd still wear the band he gave me, and I know in the future he'd like to try making a new ring for me from easier-to-work-with materials.

Matt's ring is sturdy - the only problem is that it can rust, not something you normally want in an everyday ring. So, he takes it off a lot when he is doing things where he'll get his hands wet. It is also a tiny bit loose (because he is a bit claustrophobic when it comes to wearing things), so he also takes it off to sleep and when working on things with his hands. We have a little dragon figurine whose tail is made for holding rings, and that is where the ring is supposed to go, but Matt sometimes just leaves it on the counter near where he is working, or occasionally puts it on the sink lip.

I promise I am getting to the story soon.

I have sometimes wondered if we should have just bought rings - it was a very stressful process hoping Matt could make mine in time, and then when he tried to fix it later ... but looking back, I'm glad we did what we wanted and made rings for one another. They may not have turned out perfect, but we can still remember the hard work we both put into making the rings for our wedding, and I have slowly decided that we could have rings made for everyday wear and still keep the old ones somewhere special, and they won't lose their importance for us. I think the story of our rings reminds me that even though we may not be able to make everything perfect for each other in life, we are still willing to put in effort to do what would make the other person feel most loved (because Matt's tradition of making me things makes me feel very loved), and likewise, we are both willing to look past the imperfections and find the value and beauty in each other.


OKAY HERE IS THE STORY in case you were getting bored and started scrolling down to see how long this would be.


I'm not even sure how long ago it was now - maybe a month, maybe two? - when I noticed I hadn't seen Matt's ring in a while. He doesn't really wear it at home, but I see it sitting around wherever he has temporarily stored it.

I asked him about it and he said he wasn't sure where it was, but thought he had just set it somewhere and he was sure it was in the house or at his parent's house (where we'd visited recently and done some things outside, so I guess he thought he'd taken it off for some reason there).

I was busy with a summer class at the time, but in my spare time I tried to clean up bits of the house, looking for it. I checked all his pants pockets and the washer and dryer. Not there. We looked everywhere with increasing desperation, at least on my part, over the course of a month. Matt checked at the house where he stays when he is away for work. Not there. I checked the bathroom and counters at his parent's house when we went there, even though I was sure if they'd seen it they would have said something. Not there.

I was starting to give up hope. I thought maybe Matt had set it on the kitchen counter and Llyr had knocked it to the floor and under something, but when I searched everything it could be under, it wasn't there. Then I thought maybe he'd left it on the sink counter in the bathroom and Llyr had knocked it in the small trash can next to the sink. After having spent a few weeks with it missing already, I knew that trash was long gone. I was sure the ring was gone forever.

I wasn't even sure how to think about this. I didn't want it to be true, and I just felt empty and distraught, but unable to even cry, when I thought about the ring I made for Matt being gone. I mean, it wasn't anything fancy, but it was special. Just like my ring was - even now, it is still special and I would feel devastated if I lost it.

I could go on about the worried thoughts that I tried to ignore for the most part because I really didn't know where else it could be .... but I'll get to the end of the story, which, thankfully, is happy.

We went to Matt's parent's house again a couple of days ago. Matt got out of the driver's side and bent down to get something from the back seat.

He said, "Elizabeth, you're going to want to see this."

I first thought it was maybe some weird or neat thing - like a Killdeer nest (Matt loves those birds), but he picked up something off the ground and started to come over to me on the passenger side.

I am bad about not trusting Matt when he brings over things in his hand. I'm always afraid it will be some bug or yucky creature. I asked it if was alive.

He said no, and then it clicked.

"Is it your ring?"

"Yes!"

I was SO relieved and happy.

The gist is that Matt must have had the ring in his pocket when getting into the car one time, and it fell out. For who knows how long, it had lain in the gravel part of his parent's driveway, unmoved. When he picked it up, it was wrapped around a small rock. Maybe someone drove over it or stepped on it and pressed the two together? Matt took the ring off the rock before taking a picture, but later really regretted not saving the rock as part of the crazy story. I'm just glad the ring is not lost forever.

The ring is a bit rusty now, and Matt has placed it on the dragon tail for safe keeping. I'm sure we can easily clean it up soon. We've now talked more about getting professionally made rings on a future anniversary so that Matt's can fit better and won't rust, and mine can be complete as it is supposed to be. But, I know we will still wear and keep the ones we made and treasure them forever.

We both just can't believe it was right there the entire time, and that Matt saw it there among the rocks, not even purposefully looking for it. He says a lifetime of looking at the ground to pick up coins and neat rocks prepared him to find it.

Thursday, July 3, 2014

Review: Every Day by David Levithan

Mid-June, I read David Levithan's Every Day. I've been getting through several YA novels this summer that are on the state reading lists for the upcoming school year, and this was one of them. Sadly, I ended up not liking the book very much. I say sadly because I was really interested and excited about the idea of the book . . . but the execution did not appeal to me. You can find many other reviews on the book that give you a synopsis, but I'll give a short one here:

Narrator/main character "A" wakes up every day in a different body. A resides in each body for one day only, and usually just tries to fit into the person's regular routine and not shake things up. The reader follows A through a couple of months at age sixteen (A only wakes up in the bodies of people the same age as A). One day, A falls in love with Rhiannon, the girlfriend of Justin, a boy who A inhabits. A wants to try to keep seeing Rhiannon, but as you can imagine, A's situation makes this difficult. (Luckily A swaps between people usually within a few hours of one another.)

The idea was really neat I thought, and I wanted to see how the author explained how A would deal with the difficulties this kind of life would bring. I will not be too wary of spoiling things, so watch out.

Positives: The interesting idea. Each chapter is a different day, a different person, and there are a couple that are really touching in how A deals with the person's situation (for example, deciding to "interfere" and tell a suicidal girl's dad how she feels, when A usually tries not to interfere too often). And, the few "bonus" chapters at the end detailing some days before the novel starts were pretty good as a short story on their own.

Negatives: Almost everything else. Number 1, which most of the other reviews I read after finishing the book hit on as well, was that the narrator is too "preachy." Really, it sounded like I was just reading the author's thoughts instead of a distinct voice for A. The reason for this probably stems from the fact that author David Levithan is gay, and in this novel he makes a LOT of statements through A about tolerance and acceptance. Now, I'm not against those ideas being in YA novels. However, to me it felt like the author was telling me how to feel through his narrator, instead of letting me decide for myself or make a judgement based on the actions of the characters. Plus, there were some times when I just didn't agree with the main character's ideas on those subjects. That's my own personal opinion, I know, but it colored my reading, so I'll be honest about it here.

A is especially repetitive about convincing Rhiannon that A sees him/herself as neither a a boy nor a girl. I can understand the reasoning behind that, given that A switches between the two all the time. It is harder for Rhiannon to wrap her mind around this - which I can also understand, because living 16 years in one body would make it hard to understand. I imagine A as a boy, probably because A first appears in the body of Justin (Rhiannon's boyfriend), so even though the author probably would not like it, I'm going to call A "he" from now on for consistency and ease of writing. I noticed that a lot of reviewers also automatically called A "he" and did not mention that A sees him/herself as neither, so I felt like I at least wanted to mention this fact. (I do wonder if the love interest had been a boy rather than a girl whether I/others would have viewed A more as a girl.)

So, one thing that bothered me stems from the above point. When A meets up with Rhiannon in a girl's body (often going to great lengths and breaking that vow of not meddling with the body's life), it is harder for Rhiannon to show A affection. A seems to try to make Rhiannon feel guilty about this. That's bothersome. Rhiannon is clearly a heterosexual female, and has lived so for 16 years. Even if you agree (like A seems to think), that we should just "love who we love" regardless of gender or anything, that does not negate that fact that most people are attracted to one over the other, and it's not Rhiannon's "fault" that she feels awkward being with A as a girl.

Also, I don't like that A is so selfish. He tries to make it like he's not, but he is. This is realistic, but hard to read in the first person and still "like" the narrator. He falls in love with Rhiannon while in Justin's body and he just "knows" that Justin is a jerk and Rhiannon deserves better. A acts like he is far beyond his years, which I guess is believable considering the way his life has been lived, but he sounds pompous sometimes. Besides just seeing Rhiannon more often, then finally spilling his secret, he tries to persuade her to break up with Justin, and not even very subtly (maybe that's better, though). He pretends it is for her own good, and maybe it is because Justin kind of is a jerk, but clearly A is also being selfish. Then he wants Rhiannon and him to be able to have a relationship, and ignores how difficult this will be for her - she is clearly unsure about it and finally makes it clear that it just can't work, him trying to see her all the time and dragging all these bodies all over the place. She can see that this is selfish, and he only seems to see his desire for her. Ok, a couple of times he debates and maybe realizes that this is not fair to his hosts, and I will grant that it does not seem fair for A that his life has to be lived the way it does and he can't really have a stable family and friends - but another part of me was like, well, this is the hand he has been dealt and he is going to have to live with it, as cruel as that may be.

MAJOR END-OF-BOOK SPOILERS AHEAD

Towards the end, A wakes up in the body of a boy he deems a nice guy, and he asks Rhiannon to meet him and pretend it is their first date. He has, by this time, figured out how to sort of implant what memories he wants the body's real inhabitant to keep the next day. So, the boy A is in will remember meeting Rhiannon and going on a stellar date with her. That night, he basically tells Rhiannon to stay with this guy and start a new relationship with him. Yeah, he basically picks out a guy for her since he can't be with her. Weird, controlling, and silly.

Last, the final thing that made me most angry with this book. Here is a specific passage that may illustrate the preachy-ness and how the book is really not-so-tolerant-as-it-purports-to-be in some cases.

Day 6023: "Even before I open my eyes, I like Vic. Biologically female, gendered male. Living within the definition of his own truth, just like me. He knows who he wants to be. Most people our age don't have to do that. They stay within the realm of the easy. If you want to live within the definition of your own truth, you have to choose to go through the initially painful and ultimately comforting process of finding it."

Problems with this passage:

A) I have a more objective view of "truth." While I realize that some things we call "truths" can be subjective (say, I might say "Math is hard" and that may be "true" for me but not for someone else) I think "Truth" needs to be objective or how can we have it? So I'm not sure what A means, "the definition of your own truth." I guess he means that you could be born female, like Vic,  but feel that in "truth," you are male.

B) The bigger issue: I feel the author is basically saying that anyone who is cisgender (I think I am using that correctly: someone whose "mental" sex aligns with their physical sex, as opposed to transgender) is limited, scared, or wrong. As if because I was born female, identify as female, and am attracted to men, I am taking the "easy" path. I'm sorry, but this does not mesh with everything I hear about people being "born" the way they are, their identity and desires not necessarily up to them to "choose." Levithan's narrator says "find," I guess, but what does that mean? I have to go out and try everything out to figure out what I already knew about myself? And if I don't choose to do this or don't "have to do that" as he says, am I somehow inferior than those who did have to do so? I can understand that the types of people he is referring to go through a lot of angst and perhaps persecution for "living in their own truth" ... but I am offended by this passage that makes it seem like I am taking the easy (suggesting inferior) path.

Levithan may not have meant consciously to make his writing sound this way, but to me it does. I felt continually bombarded by A's thoughts and opinions without room to make my own conclusions. I think drawing conclusions rather than being told what to think or how to feel is important in a YA novel. Yes, in school we (I'm a teacher) guide students to understand certain readings of books, but hopefully we do so in a way that helps them make their own assumptions and conclusions. Plus, I hope most of us let them keep their own opinions about the story, even if to us personally that opinion is skewed or missing something. We present the ways of looking at the story, but we don't force them to change their beliefs or morals or opinions about situations. Levithan's book made me feel like I was being forced to listen to the narrator's beliefs on everything and like if I had a differing opinion, I was being stupid, like Rhiannon when she could not show affection to A as a girl as easily.

I was sad that a book with such an interesting and promising premise turned out difficult to read. I tried imagining that A, being a teenager, is just spouting his own ideas, like teenagers do, and it was up to me to look at him as a person with flaws (selfishness, rash action) as well as good things, and make my own judgements on what he said ... but at the same time I felt that despite the fact that A is flawed as a character, the author wanted me to completely agree with all his opinions. It's hard to explain this. I guess I feel like an impressionable young reader might just take the word of this narrator as gospel without really thinking about what is being said or who is saying it because it is said in a more eloquent tone of the "teenager that every teenager wants to be," smart, funny, witty, etc. Overall, I like the idea and one or two interesting or poignant chapters, but overall Levithan's writing and A's voice made it not enjoyable for me.